
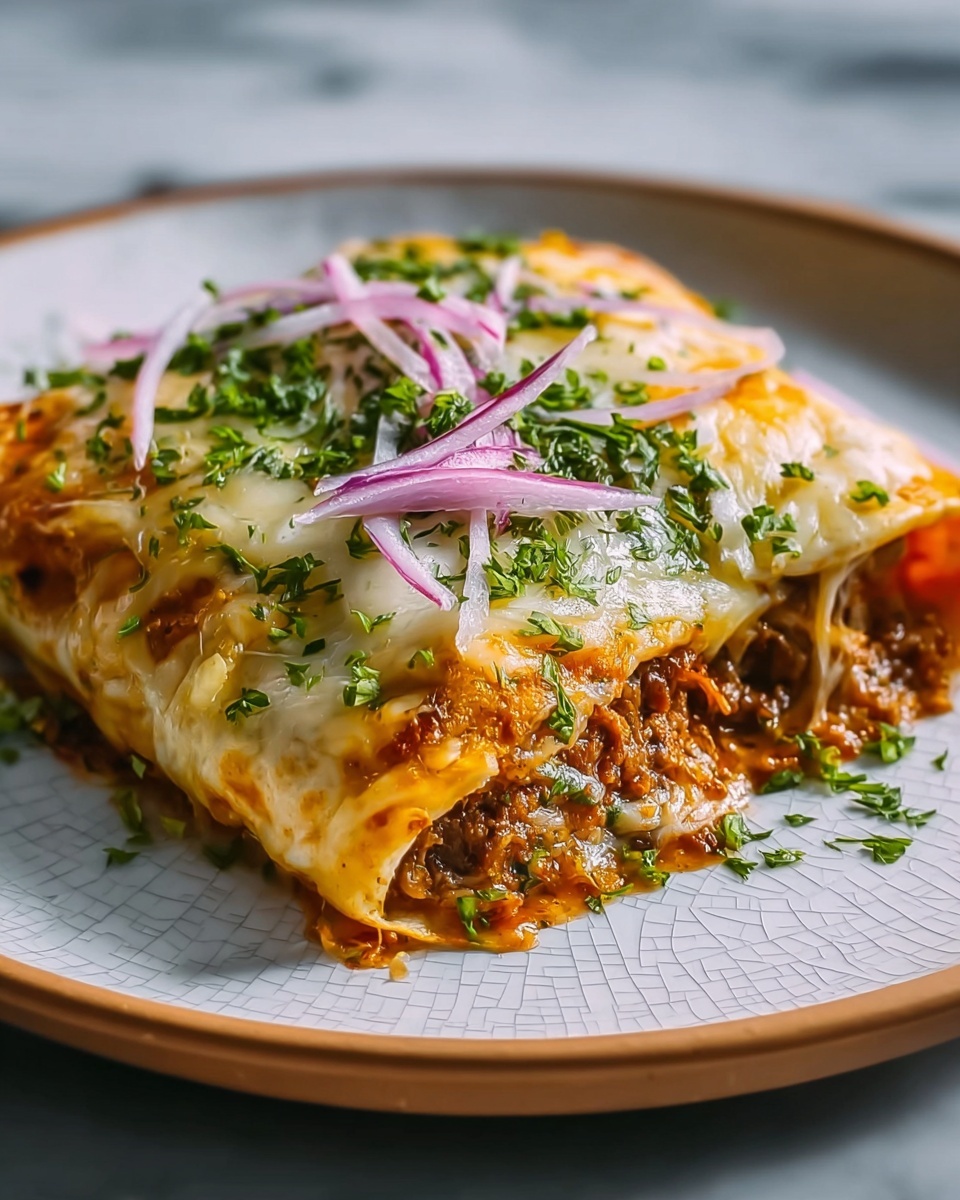
If you’re craving a delicious mash-up that brings together the best of a quesadilla and a burrito, this Homemade Quesarito Recipe is exactly what you need. It’s a mouthwatering creation that combines melty cheese, seasoned beef, savory rice, and creamy sauces all wrapped in perfectly toasted tortillas. Each bite is a glorious blend of textures and flavors that’s comforting and satisfying. Plus, making it at home means you control every element, ensuring freshness and a flavor punch that ready-mades just can’t match!
Ingredients You’ll Need
Getting ready to make this Homemade Quesarito Recipe is a breeze when you have a few simple, staple ingredients on hand. Each one plays a crucial role—from the cheesy gooeyness to the hearty protein and the creamy finishing touches—creating a perfect balance that will keep you coming back for more.
- Large flour tortillas: The sturdy, soft wrap that holds everything together and crisps up beautifully when toasted.
- Shredded cheddar cheese: Adds sharp, melty goodness that forms the essential quesadilla base.
- Cooked white or Mexican rice: Gives body and texture while absorbing all the wonderful flavors.
- Seasoned ground beef (or beef of choice): Provides savory and juicy richness as the protein star.
- Nacho cheese sauce: Brings creamy, slightly spicy decadence to each bite.
- Sour cream: Adds a cool, tangy finish that perfectly balances the savory elements.
- Shredded mozzarella or Mexican blend cheese: Extra cheesy ooze layering the inside of the wrap.
- Butter or oil (for toasting): Ensures a golden, crispy exterior every time you cook it.
- Optional extras (hot sauce, chopped jalapeños, guacamole): Customize with a little kick or creamy freshness to suit your taste.
How to Make Homemade Quesarito Recipe
Step 1: Create the Cheese Base
Start by laying one large flour tortilla flat on a clean surface and evenly sprinkle shredded cheddar cheese over the entire surface. This cheese layer is key because it will melt and help bind the two tortillas together in the next step.
Step 2: Form the Cheese Sandwich
Place the second tortilla on top of the first, gently pressing down so they seal. Heat a large skillet over medium heat and add a little butter or oil. Toast the tortilla ‘sandwich’ until golden brown and the cheddar inside is melted, flipping carefully to cook both sides. Once perfectly toasted, take it off the heat.
Step 3: Filling Assembly
Lay the toasted quesadilla flat on a clean surface. Spoon the cooked rice in a horizontal line down the center. This layer adds substance and soaks up the savory flavors to come.
Step 4: Add the Star Ingredients
On top of the rice, pile on your seasoned ground beef, then drizzle with nacho cheese sauce, dollop sour cream evenly, and sprinkle shredded mozzarella or Mexican blend cheese over everything. If you like spice or extra creaminess, feel free to add hot sauce, jalapeños, or some fresh guacamole now.
Step 5: Roll It Up
Carefully fold in the sides over the filling and roll tightly like a burrito, making sure all those flavors stay locked inside.
Step 6: Seal and Crisp
Return the rolled quesarito back to the skillet, seam-side down. Toast for 1 to 2 minutes until crispy and sealed. Flip to crisp the other side if you want an even crunchier texture. Once golden and firm, remove from heat.
Step 7: Slice and Serve
Slice your homemade treasure in half to showcase all the layers within, and serve hot alongside your favorite dipping sauces or extra sour cream for dunking.
How to Serve Homemade Quesarito Recipe

Garnishes
Top your quesarito with fresh garnishes like chopped cilantro, a squeeze of lime, or a sprinkle of diced onions for a burst of freshness that complements the rich, cheesy filling. A dollop of guacamole or pico de gallo adds color and a fun texture contrast that brightens each bite.
Side Dishes
This Homemade Quesarito Recipe pairs wonderfully with simple sides like crispy tortilla chips, a fresh salad, or Mexican street corn. Such sides add different textures and flavors, making your meal feel like a complete fiesta on the plate.
Creative Ways to Present
For a fun twist, serve your quesarito sliced on a platter for sharing or wrapped tightly in parchment paper for a portable lunch. You can also top it with a drizzle of chipotle mayo or hot sauce swirls for added flair and flavor boosts that impress every time.
Make Ahead and Storage
Storing Leftovers
If you have leftovers (and let’s be honest, that’s often the best part), wrap them tightly in foil or plastic wrap and store in the refrigerator for up to 2 days. This keeps all the yummy layers intact without drying out.
Freezing
You can freeze your Homemade Quesarito Recipe by wrapping it securely in plastic wrap and then again in foil before placing it in a freezer bag. It will keep well frozen for up to 1 month. This is perfect if you want to prep meals ahead of time and enjoy later without sacrificing any flavor.
Reheating
To bring your leftovers back to life, reheat in a skillet over medium-low heat, flipping occasionally, until warmed through and the outside is crispy again. Avoid microwaving if you want to preserve that delicious toasted texture.
FAQs
Can I use other meats instead of ground beef?
Absolutely! Ground chicken, turkey, or even plant-based meat substitutes work wonderfully in this Homemade Quesarito Recipe. Just season them well to keep that bold, savory flavor.
Is it possible to make this recipe vegetarian?
Yes, swap the ground beef for sautéed mushrooms, black beans, or a hearty veggie mix to create a satisfying vegetarian quesarito that still has plenty of texture and richness.
What kind of cheese can I substitute?
Feel free to experiment with cheeses like Monterey Jack, pepper jack for a little heat, or a Mexican blend. The key is to use cheeses that melt nicely and complement the other ingredients.
Can I make this recipe gluten-free?
Yes, use gluten-free flour tortillas to create a version that suits gluten sensitivities without giving up any of the fantastic flavor and texture of this Homemade Quesarito Recipe.
How spicy can I make it?
The spice level is totally up to you! Add chopped jalapeños, hot sauce, or chipotle powder in the filling step to enjoy a kick, or keep it mild if you prefer a more classic flavor profile.
Final Thoughts
This Homemade Quesarito Recipe is a wonderful way to elevate simple ingredients into something truly special. It’s comforting, flavorful, and perfect for any meal of the day when you want something satisfying and fun to eat. I can’t wait for you to try this recipe and make it your own—trust me, once you do, it’ll become a go-to favorite in your kitchen too!
Print
Homemade Quesarito Recipe
- Prep Time: 10 minutes
- Cook Time: 10 minutes
- Total Time: 20 minutes
- Yield: 1 serving
- Category: Main Course
- Method: Stovetop
- Cuisine: Mexican-American Fusion
Description
Enjoy a delicious homemade Quesarito, combining the crispy, cheesy goodness of a quesadilla with the hearty fillings of a burrito. This fusion dish features seasoned ground beef, cheese, rice, and creamy sauces all rolled inside toasted flour tortillas for a satisfying and flavorful meal ready in just 20 minutes.
Ingredients
Quesadilla Base
- 2 large flour tortillas
- 1/2 cup shredded cheddar cheese
- 1 tbsp butter or oil (for toasting)
Filling
- 1/2 cup cooked white or Mexican rice
- 1/2 cup seasoned ground beef (or beef of choice)
- 1/4 cup nacho cheese sauce
- 2 tbsp sour cream
- 1/4 cup shredded mozzarella or Mexican blend cheese
Optional Toppings
- Hot sauce
- Chopped jalapeños
- Guacamole
Instructions
- Prepare the Quesadilla Base: Lay one large flour tortilla flat on a clean surface and evenly sprinkle 1/2 cup shredded cheddar cheese across its surface to ensure every bite is cheesy.
- Create the Double Tortilla Layer: Place the second flour tortilla over the first one with cheese, gently pressing them together to help seal the two tortillas. Heat a large skillet over medium heat and add butter or oil to prevent sticking.
- Toast the Quesadilla: Place the double-layered tortilla in the skillet and toast until the cheese melts and the tortilla is golden brown on the bottom, about 2-3 minutes. Carefully flip and toast the other side until equally golden and melty. Remove from heat.
- Add the Fillings: Place the toasted quesadilla flat on a clean surface. Arrange the cooked rice in a horizontal line down the center. Layer on the seasoned ground beef, followed by dollops of nacho cheese sauce and sour cream. Sprinkle shredded mozzarella or Mexican blend cheese on top. Add any optional toppings like hot sauce or chopped jalapeños now if desired.
- Roll the Quesarito: Fold in the sides of the quesadilla and roll it tightly from one end to the other, creating a burrito shape that encases all the fillings securely.
- Seal and Crisp the Quesarito: Return the rolled Quesarito seam-side down to the warm skillet. Toast for 1-2 minutes to seal the edges and develop a crispy crust. Flip and toast the other side briefly if a more uniform crispiness is preferred.
- Serve: Slice the Quesarito in half for easier handling and serve it hot with your favorite dipping sauces or extra sour cream on the side for added flavor and creaminess.
Notes
- Use any ground meat or plant-based alternative as desired for variations.
- For extra flavor, season rice with cilantro, lime, or taco seasoning before adding.
- Adjust toast time based on skillet heat to avoid burning the tortilla.
- Adding guacamole or fresh salsa on the side enhances the overall taste experience.
- This recipe is single-serving but can be easily multiplied to serve more people.


