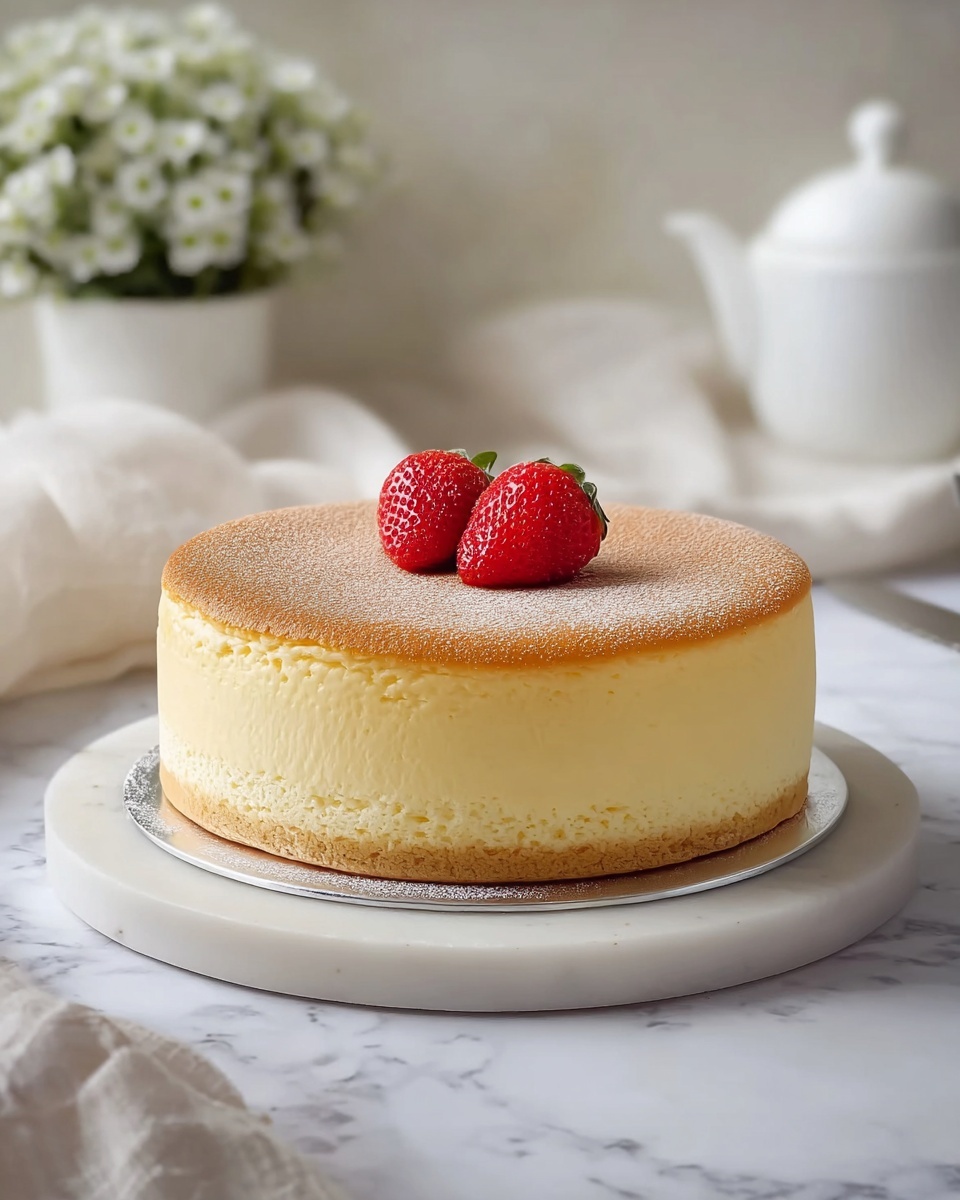
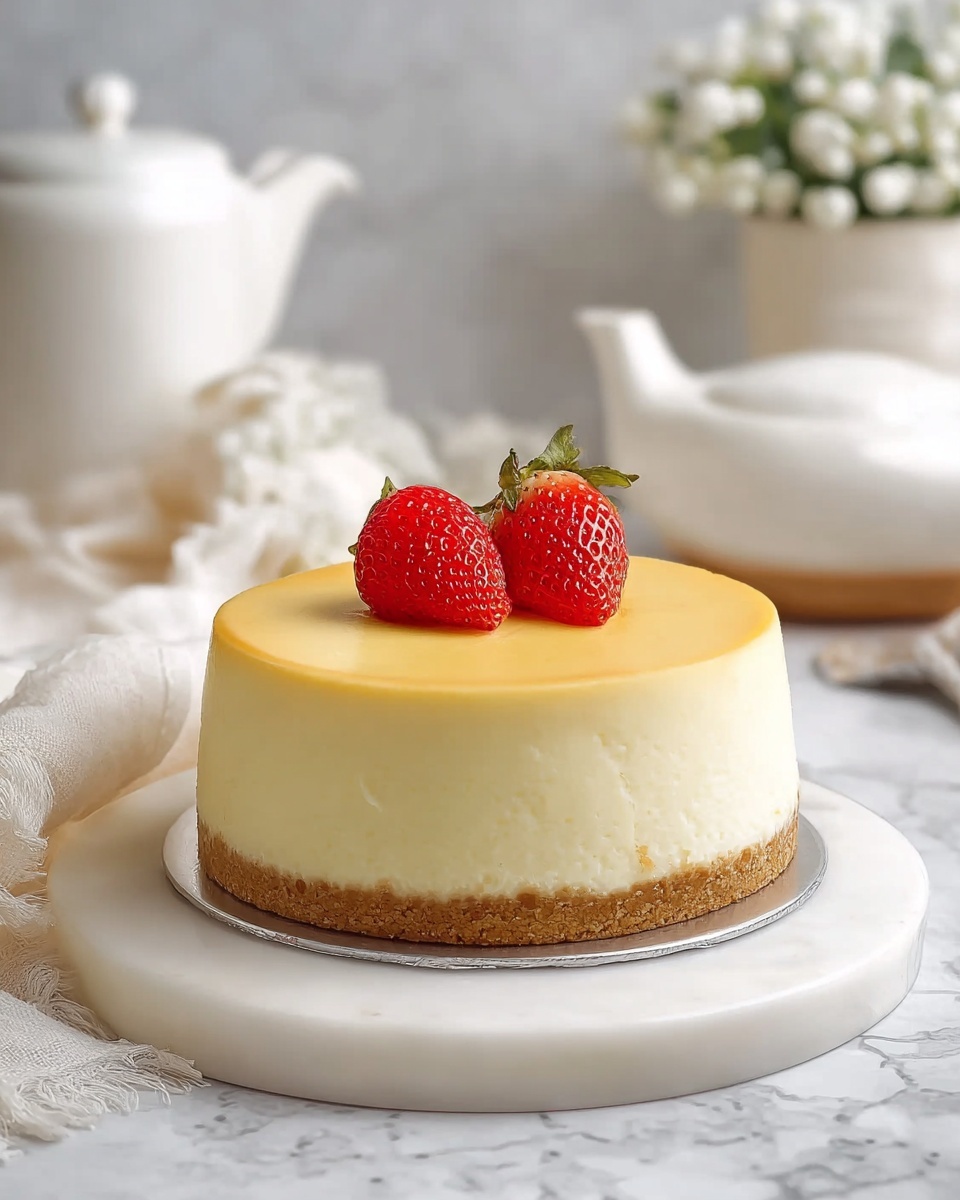
If you’ve ever dreamed of biting into a dessert that’s irresistibly airy yet rich, then this Fluffy Japanese Cotton Cheesecake That Melts in Your Mouth Recipe is your new best friend. With a texture so delicate it practically floats on your tongue, this cheesecake masterfully balances creamy sweetness and a cloud-like fluffiness unlike anything you’ve tried before. Perfect for impressing guests or treating yourself, this recipe brings together simple ingredients to create magic in every bite.
Ingredients You’ll Need
These straightforward ingredients come together beautifully to create a light, moist, and subtly sweet cheesecake that feels like a gentle hug. Each component plays a key role — from the sifted cake flour ensuring a soft crumb, to the whipped egg whites giving it that signature lift.
- 1 cup Cake Flour: Sifting is essential for that light, tender crumb that defines a cotton cheesecake.
- 2 tablespoons Cornstarch: Adds softness and helps maintain structure; potato starch works as a great substitute.
- 8 ounces Cream Cheese: The creamy heart of the cake; full-fat ensures the richest flavor and texture.
- 4 tablespoons Unsalted Butter: Room temperature butter blends smoothly for that melt-in-your-mouth feel.
- 1/2 cup Full Fat Milk: Provides moisture and richness; you can switch to non-dairy milk if needed without sacrificing taste.
- 3 Egg Yolks: Room temperature yolks emulsify better, lending color and silkiness.
- 1 teaspoon Vanilla Extract: Adds warm aromatic depth; almond extract is a wonderful variation.
- 5 Egg Whites: Whipped to medium-soft peaks, these bring the famous fluffy lift.
- 1/2 cup Granulated Sugar: Sweetens perfectly but can be adjusted to your taste.
- 1 tablespoon Lemon Juice: Keeps those egg whites stable and adds a subtle brightness.
- Powdered Sugar (Optional): For dusting and that elegant finishing touch.
How to Make Fluffy Japanese Cotton Cheesecake That Melts in Your Mouth Recipe
Step 1: Prepare Ingredients and Oven
Begin by bringing your cream cheese, butter, and egg yolks to room temperature — this will help everything blend seamlessly. Preheat your oven to 320°F (160°C) and line your cake pan with parchment paper. This early prep sets the stage for a flawlessly smooth batter and even baking.
Step 2: Melt Cream Cheese, Butter, and Milk
Gently warm the cream cheese, butter, and milk together in a heatproof bowl over a double boiler. Stir until the mixture is smooth and no lumps remain. Removing from heat, allow it to cool slightly before moving on. This step is where creaminess begins to build, ensuring a luxurious base for your fluffy cheesecake.
Step 3: Combine Egg Yolks and Vanilla
Add the room-temperature egg yolks and vanilla extract to the cooled cream cheese mixture. Stir until fully incorporated. This blend enriches the batter and brings a wonderfully fragrant warmth.
Step 4: Sift Dry Ingredients
Sift together the cake flour and cornstarch to make sure no lumps sneak into your batter. Gently fold these dry ingredients into the cream cheese mixture, being careful not to overmix. This careful blending preserves the tender, airy texture that makes this cheesecake so special.
Step 5: Whip Egg Whites with Sugar and Lemon Juice
In a clean, dry bowl, whip the egg whites until frothy, then add the lemon juice. Gradually add granulated sugar while continuing to whip until medium-soft peaks form. The lemon juice stabilizes the whites, and the sugar helps create that beautiful glossy meringue which lifts the cake.
Step 6: Fold Meringue into Batter
Delicately fold one-third of the meringue into the cream cheese mixture to lighten it. Then, carefully fold in the remaining meringue in two batches, maintaining as much air as possible. This is the secret to achieving that iconic cloud-like structure.
Step 7: Bake in a Water Bath
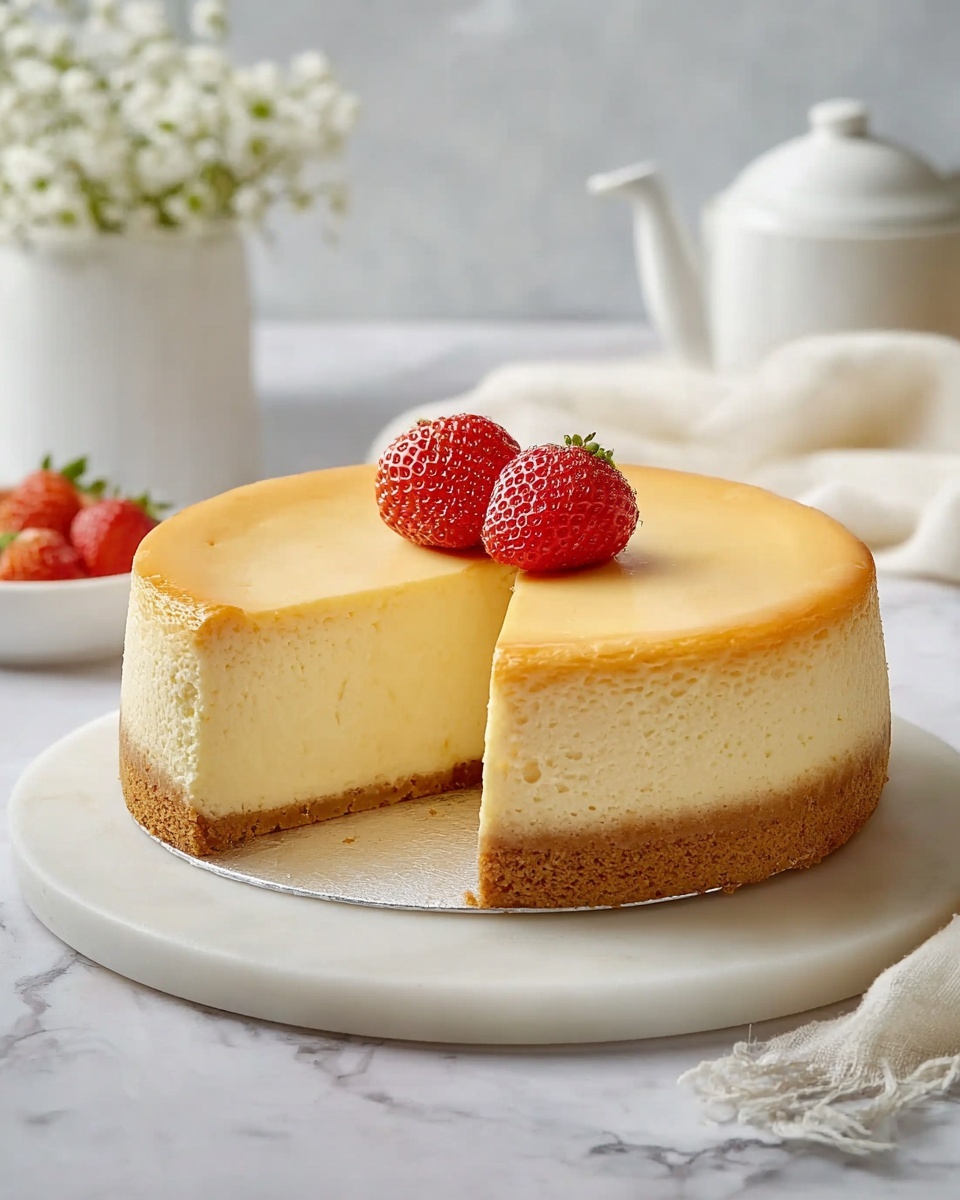
Pour the batter into your prepared pan, then place it inside a larger pan filled halfway with hot water. Bake for approximately 75 minutes until the cake has risen beautifully and a toothpick inserted comes out mostly clean. The water bath ensures gentle heat, keeping the cake moist and crack-free.
Step 8: Cool Gradually
Once baked, turn off the oven and leave the cheesecake inside with the door slightly ajar for about 30 minutes. Then transfer it to a wire rack to cool completely before removing from the pan. This slow cooling prevents sinking and keeps that melt-in-your-mouth texture intact.
How to Serve Fluffy Japanese Cotton Cheesecake That Melts in Your Mouth Recipe
Garnishes
Light dustings of powdered sugar are classic and add a touch of elegance without overpowering the delicate flavor. Fresh berries or a drizzle of strawberry sauce elevate it with a refreshing, fruity contrast. For a little extra flair, a sprinkle of toasted coconut or edible flowers makes for an inviting presentation that instantly amplifies the visual appeal.
Side Dishes
This cheesecake pairs wonderfully with a simple cup of green tea or a mild coffee, allowing its airy texture and gentle sweetness to shine. A side of fresh fruit salad or a small scoop of vanilla bean ice cream complements the softness and brings out different layers of flavor, making for a well-rounded dessert experience.
Creative Ways to Present
Consider serving individual slices atop pastel-colored plates with a garnish of mint leaves for a charming tea party vibe. You could also cut the cheesecake into bite-sized cubes for a party platter — perfect for sharing and sampling. For extra drama, stack slices layered with fresh cream and berries to make a delicate layered dessert that will wow your guests.
Make Ahead and Storage
Storing Leftovers
Wrap leftover cheesecake tightly with plastic wrap or store in an airtight container to maintain its moist, fluffy texture. Keep it in the refrigerator where it will stay fresh for up to 3 days. Unlike denser cheesecakes, this delicate recipe holds its charm best when eaten promptly but still allows some wiggle room to savor later.
Freezing
You can freeze this cheesecake by wrapping each slice individually in plastic wrap and then placing them in a freezer-safe container or bag. Freeze for up to one month. When you’re ready to enjoy, thaw slices in the refrigerator overnight — this prevents condensation from sogging the texture, preserving that melt-in-your-mouth quality.
Reheating
If you prefer your cheesecake slightly warm, gently reheat slices in a low oven (around 250°F or 120°C) for 10 minutes or until just warmed through. Avoid microwaving as it may affect the texture unfavorably. Reheating softly enhances the creamy softness while keeping that ethereal lightness intact.
FAQs
Can I use low-fat cream cheese for this recipe?
While you can substitute low-fat cream cheese, it might impact the richness and texture, resulting in a less creamy and slightly denser cheesecake. For the authentic melt-in-your-mouth experience, full-fat cream cheese is highly recommended.
Why is a water bath necessary when baking this cheesecake?
The water bath provides gentle, even heat, preventing the cake from cracking or drying out. It helps maintain moisture and ensures the cheesecake cooks slowly and uniformly, which is essential for its characteristic fluffiness.
How can I tell when the cheesecake is done baking?
The cake should be puffed up and a toothpick inserted in the center will come out mostly clean with a few moist crumbs. The top may look lightly golden but should not be browned or cracked. A slight jiggle in the center is normal and signals the perfect consistency.
Can I replace the cake flour with all-purpose flour?
Using cake flour is ideal because of its lower protein content which creates a lighter and softer crumb. All-purpose flour can be used in a pinch but may yield a denser texture. If substituting, try removing 2 tablespoons of all-purpose flour per cup and replacing them with cornstarch to mimic cake flour.
What causes the cheesecake to sink after baking and how can I prevent it?
Sinking typically happens if the batter is overmixed, the oven temperature is too high, or if the cake cools too quickly. To avoid this, fold ingredients gently to retain air, bake in a water bath at the right temperature, and cool the cake gradually in the oven before transferring to room temperature.
Final Thoughts
Making the Fluffy Japanese Cotton Cheesecake That Melts in Your Mouth Recipe is an absolute joy — from the delicate folding to the heavenly first bite. Its lightness and creaminess will have you hooked, turning any ordinary day into a special occasion. I encourage you to try it out and watch how this magical cheesecake becomes one of your favorite homemade desserts in no time!
Print
Fluffy Japanese Cotton Cheesecake That Melts in Your Mouth Recipe
- Prep Time: 20 minutes
- Cook Time: 75 minutes
- Total Time: 95 minutes
- Yield: 8 slices
- Category: Dessert
- Method: Baking
- Cuisine: Japanese
- Diet: Low Fat
Description
This Fluffy Japanese Cotton Cheesecake offers a light and airy texture that melts effortlessly in your mouth. Combining a delicate blend of cream cheese, cake flour, and perfectly whipped egg whites, this dessert is a delightful balance of sweetness and richness, making it an elegant treat for any occasion.
Ingredients
Dry Ingredients
- 1 cup Cake Flour (Ensure to sift for a lighter texture)
- 2 tablespoons Cornstarch (Can be swapped with potato starch)
- 1/2 cup Granulated Sugar (Adjust based on sweetness preference)
Dairy & Fat
- 8 ounces Cream Cheese (Use full-fat for best results)
- 4 tablespoons Unsalted Butter (Should be at room temperature)
- 1/2 cup Milk (Full Fat) (Non-dairy milk can be used)
Eggs & Flavorings
- 3 Egg Yolks (Use room temperature for better emulsification)
- 5 Egg Whites (Must be whipped to medium-soft peaks)
- 1 teaspoon Vanilla Extract (Can substitute with almond extract)
- 1 tablespoon Lemon Juice (Vital for stabilizing egg whites)
Optional
- Powdered Sugar (For aesthetic finish)
Instructions
- Prepare Ingredients: Bring all dairy products and eggs to room temperature, which facilitates better mixing and emulsification for a smoother batter.
- Mix Cream Cheese Mixture: In a heatproof bowl, gently melt the cream cheese, unsalted butter, and milk over a double boiler. Stir continuously until smooth and combined, then remove from heat and let it cool slightly.
- Combine Dry Ingredients: Sift together the cake flour and cornstarch to aerate the mixture, which contributes to the cake’s characteristic fluffiness.
- Add Egg Yolks and Vanilla: Whisk the egg yolks and vanilla extract into the cream cheese mixture until completely incorporated.
- Fold in Dry Ingredients: Gradually add the sifted flour mixture into the cream cheese batter. Mix gently to avoid deflating the batter, ensuring a smooth, lump-free consistency.
- Whip Egg Whites: In a separate clean bowl, whip the egg whites with the lemon juice to stabilize until medium-soft peaks form. Gradually add granulated sugar while continuing to whip until stiff but not dry peaks are achieved.
- Incorporate Egg Whites: Gently fold one-third of the whipped egg whites into the cream cheese batter to lighten it. Then carefully fold in the remaining egg whites in two additions, preserving as much air as possible for the fluffy texture.
- Prepare Pan and Batter: Line a round cake pan with parchment paper. Pour batter evenly into the pan and tap it lightly to release any large air bubbles. Wrap the outside of the pan with foil to prevent water from seeping in.
- Bake Using Water Bath: Place the cake pan into a larger roasting pan filled with hot water halfway up the sides of the cake pan. Bake in a preheated oven at 320°F (160°C) for about 70-75 minutes until the surface is golden and a skewer inserted comes out clean.
- Cool and Serve: Remove the cheesecake from the water bath and allow it to cool in the pan for about 15 minutes before transferring to a wire rack to cool completely. Dust with powdered sugar if desired before slicing into 8 portions and serving.
Notes
- Make sure all ingredients are at room temperature before starting to ensure proper mixing and stable batter.
- Be gentle when folding the egg whites to retain airiness, which is key to the cake’s fluffy texture.
- Using a water bath prevents the cake from cracking and helps achieve the signature soft, moist crumb.
- Adjust sugar according to your sweetness preference, but do not omit lemon juice as it stabilizes the meringue.
- Allow the cake to cool completely to set its delicate structure before slicing.
- This cake is best served fresh but can be stored in the refrigerator for up to 3 days, wrapped tightly to maintain moisture.


