
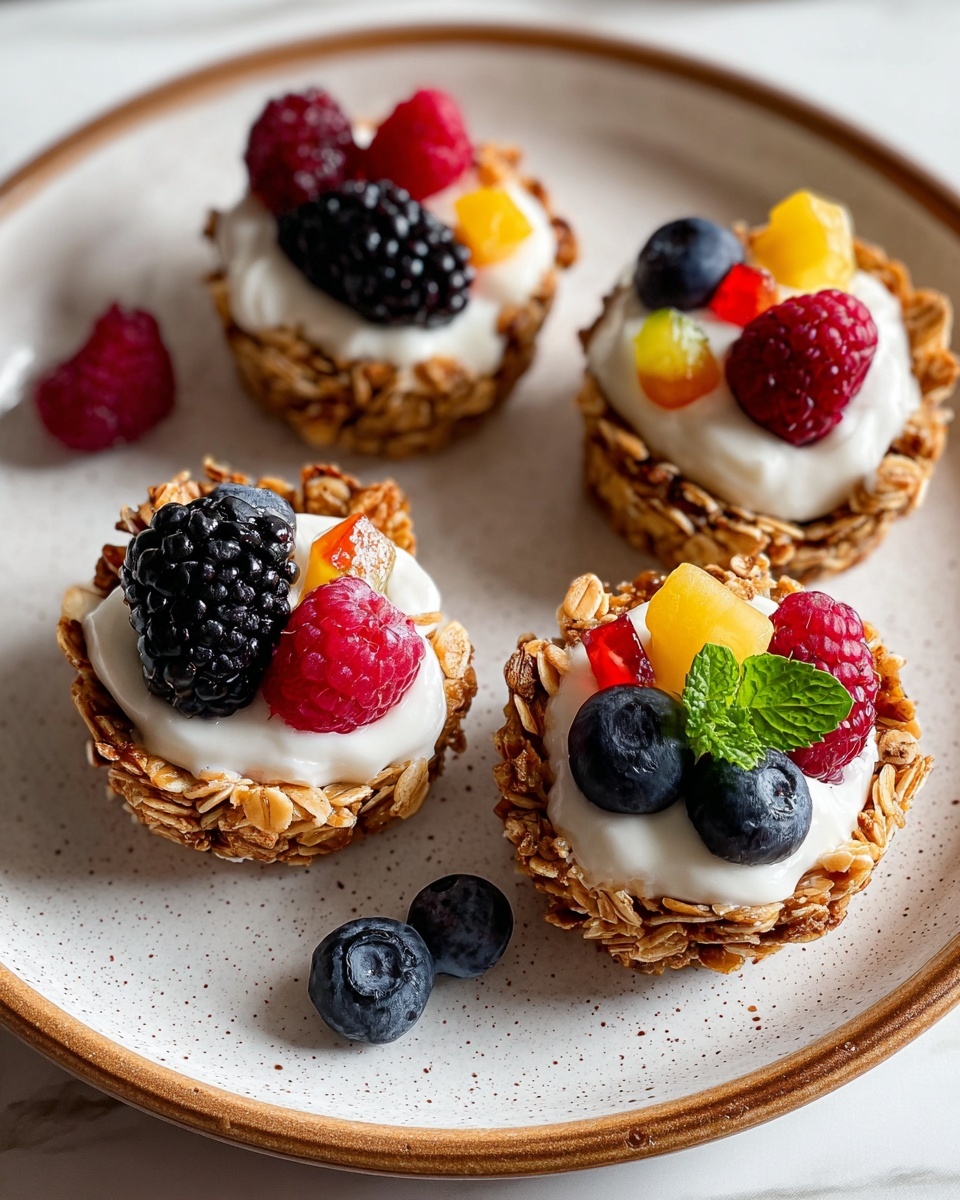
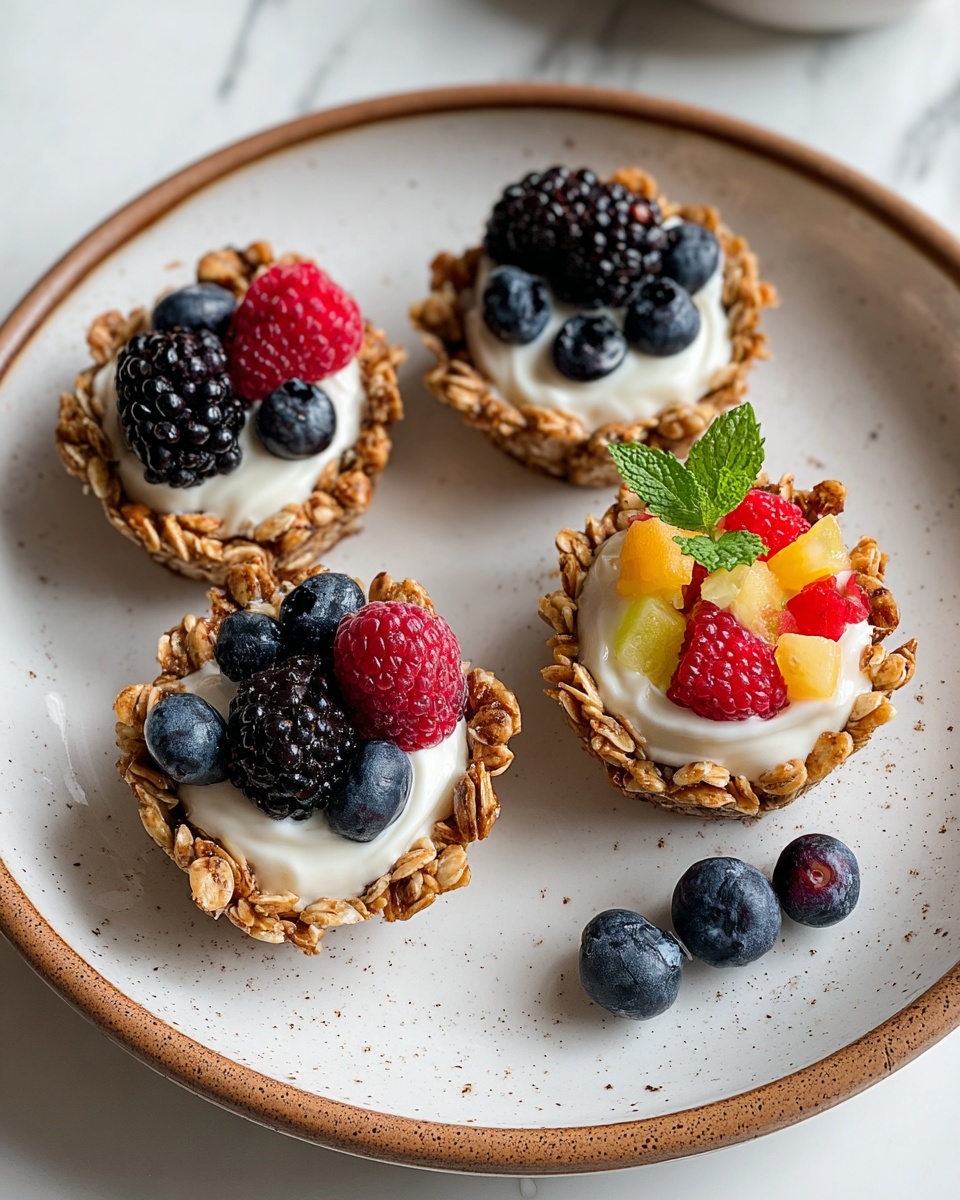
If you’re craving a delightful way to start your morning, the Breakfast Granola Cups Recipe is exactly what you need. These crunchy, bite-sized treats combine the wholesome goodness of oats, the nutty warmth of almond or peanut butter, and the natural sweetness of honey or maple syrup, all baked into convenient little cups that are perfect for grab-and-go breakfasts or a wholesome snack. Each cup is packed with texture and flavor—from the crunch of chopped nuts to the chewy bursts of dried fruit—making every bite an absolute joy. Trust me, once you try this Breakfast Granola Cups Recipe, your mornings will never be the same!
Ingredients You’ll Need
Preparing these granola cups is refreshingly simple, thanks to a handful of essential ingredients that each play a unique role. From the hearty oats that provide structure to the sticky nut butter and honey that bind everything together, every component is geared to make the perfect balance of taste and texture.
- 2 cups rolled oats: The hearty base that gives the granola cups their wonderfully chewy texture.
- 1/2 cup honey or maple syrup: Natural sweetness and a sticky binder that holds everything together nicely.
- 1/2 cup nut butter (almond or peanut): Adds richness and a creamy, nutty depth of flavor.
- 1/2 cup chopped nuts (almonds or walnuts): Provides a satisfying crunch and healthy fats.
- 1/4 cup seeds (chia or flaxseed): Boosts nutrition and adds subtle texture.
- 1/2 cup dried fruit (raisins or cranberries): Chewy bursts of natural sweetness that brighten each bite.
- 1 tsp cinnamon: A warm spice that enhances flavor complexity.
- 1/4 tsp salt: Balances the sweetness and enhances overall flavor.
How to Make Breakfast Granola Cups Recipe
Step 1: Preheat Your Oven
Start by getting your oven ready at 350°F (175°C). This steady, moderate temperature is perfect for baking the granola cups to a golden, crispy finish without burning the edges.
Step 2: Combine the Dry Ingredients
Grab a large mixing bowl and toss together the rolled oats, chopped nuts, seeds, cinnamon, and salt. These dry ingredients create the sturdy base that gives your granola cups structure and plenty of texture.
Step 3: Mix the Wet Ingredients
In a separate bowl, blend your honey or maple syrup with the nut butter until it’s smooth and velvety. This sweet and nutty blend will coat the dry ingredients perfectly, binding everything into a cohesive mixture.
Step 4: Combine and Press into Muffin Tin
Pour the wet mixture over the dry ingredients and stir until every oat and nut is thoroughly coated. Then, grease a muffin tin to prevent sticking, and press about two tablespoons of the mixture firmly into each cup to shape your granola cups.
Step 5: Bake Until Golden
Bake the granola cups for 15 to 20 minutes. Look for a beautiful golden-brown color, which signals they’ve crisped up nicely. Once baked, allow them to cool completely before carefully removing from the tin—this helps them set perfectly and prevents crumbling.
How to Serve Breakfast Granola Cups Recipe
Garnishes
Finishing your granola cups with a flourish makes breakfast feel extra special. Try topping each cup with a dollop of Greek yogurt, a drizzle of honey, or a handful of fresh berries. These garnishes add creaminess, freshness, and a pop of vibrant color that will make your granola cups irresistible.
Side Dishes
Pair these granola cups with a side of sliced seasonal fruit or a warm cup of herbal tea for a balanced morning meal. Their crunchy and sweet profile also pairs wonderfully with a creamy smoothie or freshly squeezed juice to keep your energy levels up.
Creative Ways to Present
Don’t hesitate to get creative! Serve your granola cups on a wooden board sprinkled with nuts and dried fruit, or stack them and thread with a rustic twine for a charming gift presentation. If you’re feeling festive, incorporate edible flowers or a dusting of powdered sugar for a special brunch table centerpiece.
Make Ahead and Storage
Storing Leftovers
These granola cups store beautifully in an airtight container at room temperature for up to a week. Keeping them dry and sealed ensures they remain crisp and fresh, ready to brighten your mornings whenever you want.
Freezing
If you want to keep your granola cups longer, pop them into the freezer in a sealed container or freezer bag. They’ll keep well for up to two months, so you can make a big batch ahead and enjoy your Breakfast Granola Cups Recipe anytime with minimal effort.
Reheating
To bring them back to that fresh-from-the-oven crispness, warm your granola cups in a preheated oven at 300°F (150°C) for about 5-7 minutes. Alternatively, a brief zap in the microwave can warm them up quickly, although baking preserves their crunch best.
FAQs
Can I use different nuts or seeds in the Breakfast Granola Cups Recipe?
Absolutely! Feel free to swap in your favorites like pecans, pistachios, sunflower seeds, or pumpkin seeds. Just keep the overall quantity the same to maintain the right texture and balance.
Is it possible to make this recipe vegan?
Yes, simply use maple syrup instead of honey and make sure your nut butter contains no animal products. This swap keeps the granola cups delicious and completely plant-based.
How crunchy do the granola cups get after baking?
When cooled, they develop a wonderful crispy exterior while maintaining a bit of chew inside, making them satisfying to bite into. Pressing the mixture firmly into the muffin tin helps achieve that ideal crunch.
Can I add chocolate chips or other mix-ins?
Definitely! Chocolate chips, shredded coconut, or even a sprinkle of sea salt on top can be amazing additions. Just mix chocolate chips in after baking or add coconut before baking for extra flavor.
Are these granola cups suitable for kids’ lunchboxes?
They are a fantastic snack for kids—portable, not messy, and packed with wholesome ingredients. Plus, kids love the fun shape and the sweet, nutty taste.
Final Thoughts
Making the Breakfast Granola Cups Recipe isn’t just about crafting a delicious meal; it’s a joyful way to start your day with wholesome, hand-crafted goodness. These little cups of breakfast magic bring together simple ingredients in a charming and convenient package that suits any lifestyle. So why not treat yourself and your loved ones to a batch? I promise you’ll fall in love with every crunchy, chewy bite.
Print
Breakfast Granola Cups Recipe
- Prep Time: 10 minutes
- Cook Time: 20 minutes
- Total Time: 30 minutes
- Yield: 12 granola cups (approximately 12 servings)
- Category: Breakfast
- Method: Baking
- Cuisine: American
- Diet: Vegetarian
Description
These Breakfast Granola Cups are a nutritious and delicious way to start your day, combining rolled oats, nut butter, honey, and a mix of nuts, seeds, and dried fruits baked into convenient, golden-brown cups. Perfect for a grab-and-go breakfast or a healthy snack.
Ingredients
Dry Ingredients
- 2 cups rolled oats
- 1/2 cup chopped nuts (almonds or walnuts)
- 1/4 cup seeds (chia or flaxseed)
- 1 tsp cinnamon
- 1/4 tsp salt
Wet Ingredients
- 1/2 cup honey or maple syrup
- 1/2 cup nut butter (almond or peanut)
Add-ins
- 1/2 cup dried fruit (raisins or cranberries)
Instructions
- Preheat the Oven: Set your oven to 350°F (175°C) to prepare for baking the granola cups.
- Mix Dry Ingredients: In a large bowl, combine rolled oats, chopped nuts, seeds, cinnamon, and salt. Stir thoroughly to distribute all ingredients evenly.
- Combine Wet Ingredients: In a separate bowl, whisk together the honey (or maple syrup) and nut butter until you achieve a smooth, cohesive mixture.
- Combine Both Mixtures: Pour the wet mixture over the dry ingredients and mix well to coat everything evenly. Stir in the dried fruit gently to incorporate.
- Prepare Muffin Tin: Grease a muffin tin lightly to prevent sticking.
- Form Granola Cups: Press about two tablespoons of the granola mixture firmly into each muffin cup, shaping each into a cup-like form.
- Bake: Place the muffin tin in the preheated oven and bake for 15 to 20 minutes or until the granola cups turn golden brown and set.
- Cool and Serve: Remove from the oven and allow the cups to cool completely before carefully removing them from the muffin tin to maintain their shape.
Notes
- You can substitute nut butter types (almond or peanut) and dried fruits (raisins or cranberries) based on personal preference.
- Ensure you press the mixture firmly into the muffin tin cups to help the granola cups hold their shape after baking.
- Store granola cups in an airtight container at room temperature for up to a week.
- For a vegan option, use maple syrup instead of honey.
- Adding a touch of vanilla extract can enhance the flavor profile.

