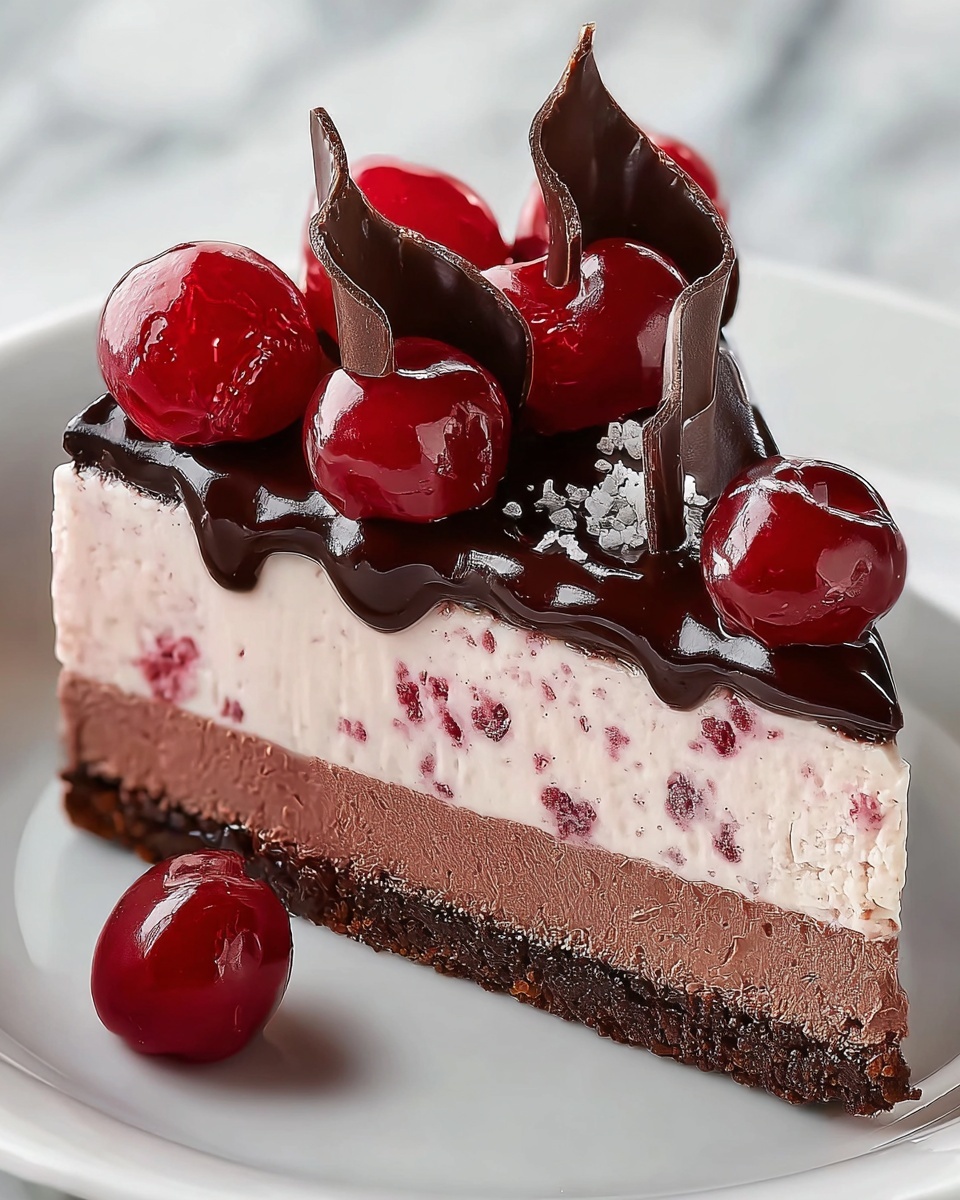
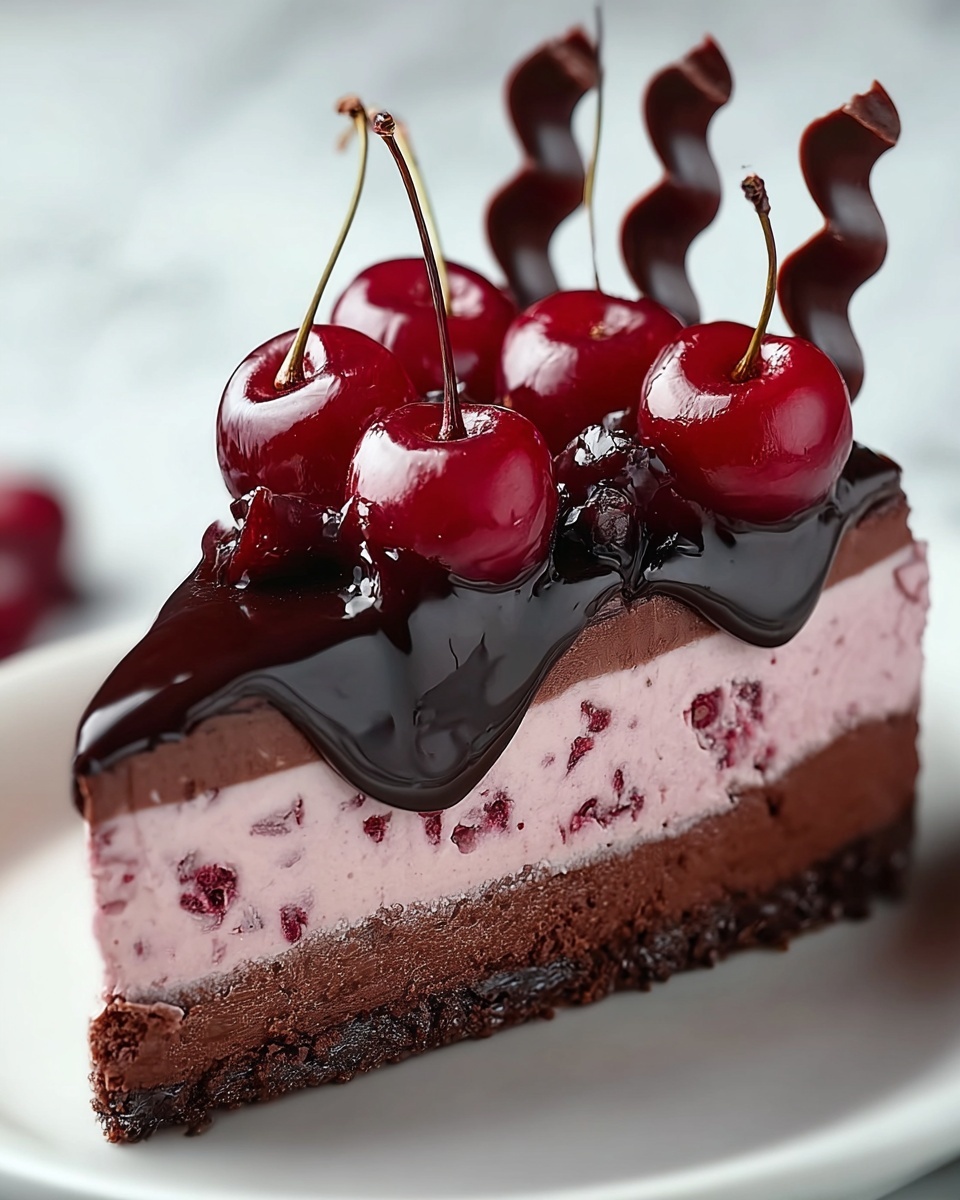
If you’re craving a dessert that’s both luxurious and fuss-free, this Chocolate Cherry No-Bake Cheesecake Recipe is an absolute showstopper. Combining rich, velvety chocolate cheesecake with a bright, tangy cherry topping, this no-bake wonder delivers indulgence without the wait of baking. Perfectly creamy and surprisingly light, it’s guaranteed to become your go-to treat for any occasion where you want to impress without the stress.
Ingredients You’ll Need
The magic of this Chocolate Cherry No-Bake Cheesecake Recipe lies in its simple but carefully chosen ingredients. Each one plays a key role, from the crunchy chocolate cookie crust providing texture to the luscious cream cheese filling enriched by dark chocolate. The cherries bring a refreshing burst of color and flavor that balances everything beautifully.
- 16 Oreos or chocolate sandwich cookies (filling removed): These create a perfectly crunchy, chocolaty base for the crust.
- 1/4 teaspoon salt: Just enough to enhance the chocolate notes and balance sweetness.
- 1/4 cup melted butter: Binds the cookie crumbs together firmly to hold the crust in place.
- 1 1/2 cups heavy whipping cream: Whipped to add lightness and a creamy texture to the filling.
- 1 envelope unflavored gelatin: Essential for setting the cheesecake without baking.
- 8 oz cream cheese, softened: Gives the filling its classic, smooth richness.
- 1/2 cup powdered sugar: Sweetens the filling evenly without any graininess.
- 1/4 cup Dutch-processed cocoa powder: Adds a deep, intense chocolate flavor.
- 4 oz dark chocolate, melted: Creates a luscious, glossy chocolate dimension throughout the cheesecake.
- 1 teaspoon vanilla extract: Brings warmth and enhances all the chocolate and cherry flavors.
- 2 cups pitted cherries (fresh or frozen): Provides the juicy, tart topping that pairs wonderfully with chocolate.
- 1/4 cup sugar: Sweetens the cherry sauce to balance the natural tartness.
- 1 tablespoon cornstarch: Thickens the cherry sauce to a perfect consistency.
- 1 tablespoon lemon juice: Brightens the cherry sauce and adds a hint of freshness.
How to Make Chocolate Cherry No-Bake Cheesecake Recipe
Step 1: Crush the Cookies for the Crust
Start by pulverizing your Oreos in a food processor until they become fine crumbs. Mixing them with salt and melted butter creates a crumbly base that will hold strong and add a rich chocolate flavor to your cheesecake. This crust forms the foundation of the dish, so be sure to press it evenly into your pan for a sturdy, delicious base.
Step 2: Form the Crust
Once the crumb mixture looks perfect, press it firmly into the bottom of a springform pan. This compact layer will crisp up slightly as it chills, giving you that delightful cookie crunch to contrast the creamy filling. Set it aside while you move on to the decadent filling.
Step 3: Dissolve the Gelatin
Combining gelatin with a bit of heavy cream, then microwaving it gently ensures it dissolves fully without clumps. This step is a crucial one in the Chocolate Cherry No-Bake Cheesecake Recipe because it allows the cheesecake to set and maintain its structure without heat.
Step 4: Prepare the Filling
Beat softened cream cheese with powdered sugar and Dutch-processed cocoa powder to create a silky, sweet, chocolatey base. Incorporate the melted dark chocolate for extra intensity and smoothness. Then fold in the remaining whipped cream and a touch of vanilla for a wonderfully airy texture — this is where the cheesecake gets its dreamy, decadent character.
Step 5: Add Gelatin to the Filling
Gently pour in the cooled gelatin mixture, folding carefully so the filling stays light and fluffy. This step is what sets this dessert apart by letting the cheesecake chill into a perfectly firm yet creamy slice without a single minute spent baking.
Step 6: Assemble and Chill
Pour your luscious filling over the prepared crust and smooth the top with a spatula. Refrigerate for at least four hours to allow it to set beautifully. The wait might be tough, but it’s well worth it — the texture will be smooth, stable, and irresistible.
Step 7: Make the Cherry Sauce
While your cheesecake chills, cook fresh or frozen cherries on the stovetop with sugar, cornstarch, and lemon juice. Stir frequently as the mixture thickens into a glossy, vibrant sauce that perfectly complements the rich chocolate layers with fresh fruit brightness.
Step 8: Cool the Cherry Sauce
Set your cherry sauce aside to cool to room temperature, then chill it in the refrigerator. This helps the sauce achieve the perfect consistency and temperature to contrast the creamy cold cheesecake slices.
Step 9: Remove and Slice
Carefully remove the cheesecake from the springform pan once it has fully set. This allows you to showcase those beautiful perfectly sliced layers that embody everything this Chocolate Cherry No-Bake Cheesecake Recipe promises.
Step 10: Top with Cherry Sauce
Finally, serve slices of the cheesecake drizzled generously with your cooled cherry sauce. The combination of smooth chocolate filling, crunch from the Oreo crust, and the tangy cherries makes each bite a celebration of texture and flavor!
How to Serve Chocolate Cherry No-Bake Cheesecake Recipe

Garnishes
Top your cheesecake slices with fresh whole cherries or a few chocolate shavings to elevate the presentation. A light dusting of cocoa powder or a sprig of mint can add a fresh touch and color contrast that makes your dessert as beautiful as it is delicious.
Side Dishes
This cheesecake pairs wonderfully with a cup of rich espresso or a sweet dessert wine like a ruby port. For a lighter option, serve with fresh fruit salad consisting of berries or sliced kiwi to complement the chocolate cherry flavors without overwhelming your palate.
Creative Ways to Present
Try serving individual portions in glass jars or clear cups to showcase the layers visually. Alternatively, swirl some cherry sauce into the filling before chilling for a marbled effect, or layer whole cherries between crust and filling for an extra surprise. Your guests will be wowed by these thoughtful presentations!
Make Ahead and Storage
Storing Leftovers
Keep any leftover cheesecake covered tightly in the refrigerator to maintain its creamy texture. It will stay fresh for up to 3-4 days, allowing you to enjoy that delicious Chocolate Cherry No-Bake Cheesecake Recipe again and again.
Freezing
This cheesecake freezes beautifully. Wrap individual slices or the entire cake snugly in plastic wrap and foil, then place in the freezer. When ready to enjoy, thaw overnight in the refrigerator for best texture and flavor.
Reheating
Since this is a no-bake cheesecake, it’s best served chilled. Avoid reheating. Instead, allow frozen portions to thaw completely in the fridge before serving to preserve the ideal creamy, rich consistency.
FAQs
Can I use fresh cherries instead of frozen?
Absolutely! Fresh cherries bring a vibrant flavor and bright color to the topping. Just be sure to pit them first and adjust the cooking time slightly as fresh cherries may release more moisture.
Is there a substitute for the gelatin?
You can try agar-agar as a vegetarian alternative, but keep in mind that the setting properties differ. Follow the package instructions carefully to ensure your cheesecake sets properly.
Can I make this cheesecake gluten-free?
Yes! Simply swap out the Oreos for gluten-free chocolate cookies. The crust’s crunch is essential, so choose a gluten-free cookie that holds up well when crushed and mixed with butter.
How long does the cheesecake need to chill?
It’s best to chill the cheesecake for at least 4 hours to allow the gelatin to set completely. Overnight chilling will give you an even firmer and more cohesive slice.
Can I prepare the cherry sauce in advance?
Definitely! Making the cherry sauce ahead of time lets the flavors meld beautifully. Just refrigerate it until ready to serve and spoon over the cheesecake slices for that perfect finishing touch.
Final Thoughts
There’s something truly special about this Chocolate Cherry No-Bake Cheesecake Recipe — it feels like an effortless celebration every time you make it. From its easy-to-assemble layers to the heavenly blend of chocolate and cherries, it’s a dessert that invites smiles and second helpings. Give this recipe a try for your next gathering or just to treat yourself; I promise it will quickly become a cherished favorite in your recipe repertoire.
Print
Chocolate Cherry No-Bake Cheesecake Recipe
- Prep Time: 20 minutes
- Cook Time: 15 minutes
- Total Time: 4 hours 35 minutes
- Yield: 8 servings
- Category: Dessert
- Method: No-Cook
- Cuisine: American
- Diet: Vegetarian
Description
This decadent Chocolate Cherry No-Bake Cheesecake features a rich and creamy chocolate cheesecake filling on a crunchy Oreo cookie crust, topped with a luscious homemade cherry sauce. Perfect for a no-bake dessert that requires minimal effort but delivers maximum flavor and elegance.
Ingredients
Crust
- 16 Oreos or chocolate sandwich cookies (filling removed)
- 1/4 teaspoon salt
- 1/4 cup melted butter
Filling
- 1 1/2 cups heavy whipping cream, divided
- 1 envelope unflavored gelatin
- 8 oz cream cheese, softened
- 1/2 cup powdered sugar
- 1/4 cup Dutch-processed cocoa powder
- 4 oz dark chocolate, melted
- 1 teaspoon vanilla extract
Cherry Sauce
- 2 cups pitted cherries (fresh or frozen)
- 1/4 cup sugar
- 1 tablespoon cornstarch
- 1 tablespoon lemon juice
Instructions
- Crush the Cookies: In a food processor, crush the Oreo cookies into fine crumbs. Mix together with salt and melted butter until the mixture is well combined and holds together when pressed.
- Form the Crust: Press the cookie mixture evenly into the bottom of a springform pan to create the cheesecake crust. Set it aside to provide a solid base for the filling.
- Dissolve the Gelatin: Combine 1/2 cup of the heavy whipping cream with the unflavored gelatin in a microwave-safe bowl. Let it sit for 5 minutes to bloom the gelatin, then microwave for 1 minute, stirring halfway through until fully dissolved. Allow this mixture to cool.
- Make the Filling: In a large mixing bowl, beat together the softened cream cheese, powdered sugar, cocoa powder, and melted dark chocolate until smooth and creamy. Gradually fold in the remaining 1 cup of heavy whipping cream and vanilla extract, whisking gently to maintain a fluffy texture.
- Add Gelatin: Slowly incorporate the cooled gelatin mixture into the cheesecake filling, mixing carefully to ensure it’s evenly distributed without deflating the batter.
- Assemble: Pour the cheesecake filling over the prepared crust in the springform pan, smoothing the surface with a spatula. Refrigerate the cheesecake for at least 4 hours or until fully set and firm.
- Cook the Sauce: In a saucepan over medium heat, combine the pitted cherries, sugar, cornstarch, and lemon juice. Stir occasionally as the mixture heats, bringing it to a boil and cooking until the sauce thickens, about 5–7 minutes.
- Cool: Remove the cherry sauce from heat and let it cool to room temperature. Once cooled, refrigerate until chilled to enhance its flavor and texture.
- Remove from Pan: After the cheesecake has fully set, carefully remove the springform pan’s outer ring to expose the cheesecake.
- Top with Cherry Sauce: Slice the cheesecake and serve each portion topped generously with the chilled cherry sauce for a delightful combination of creamy chocolate and fruity tartness.
Notes
- For best results, use fresh cherries when in season; frozen cherries work well but should be thawed before cooking.
- If you prefer a firmer crust, bake the Oreo crust for 8-10 minutes at 350°F before assembling the filling (optional step).
- Ensure gelatin is fully dissolved and slightly cooled before adding to avoid lumps in the filling.
- This cheesecake requires at least 4 hours of chilling time, but overnight refrigeration improves texture and flavor.
- Use full-fat cream cheese and heavy cream for the creamiest filling.


