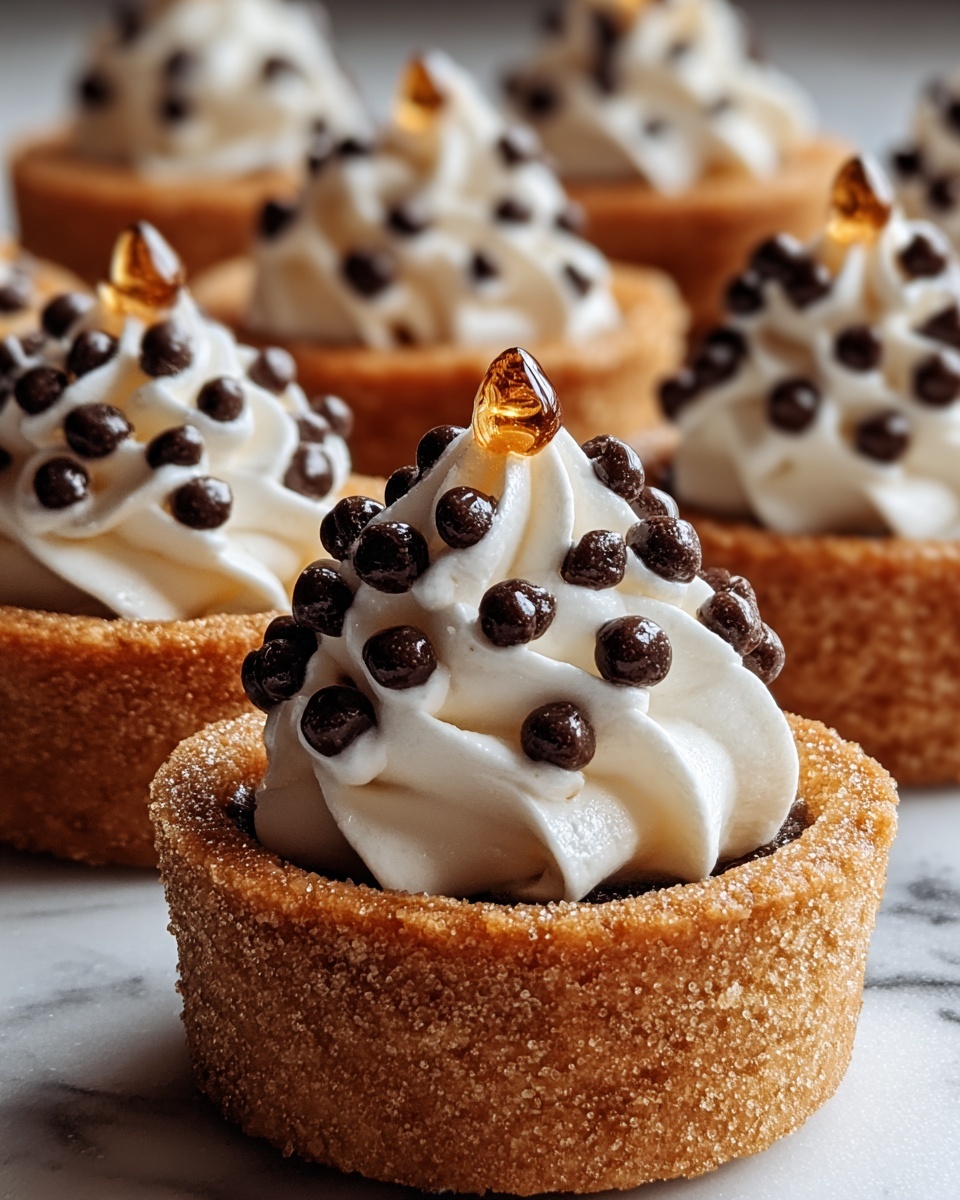
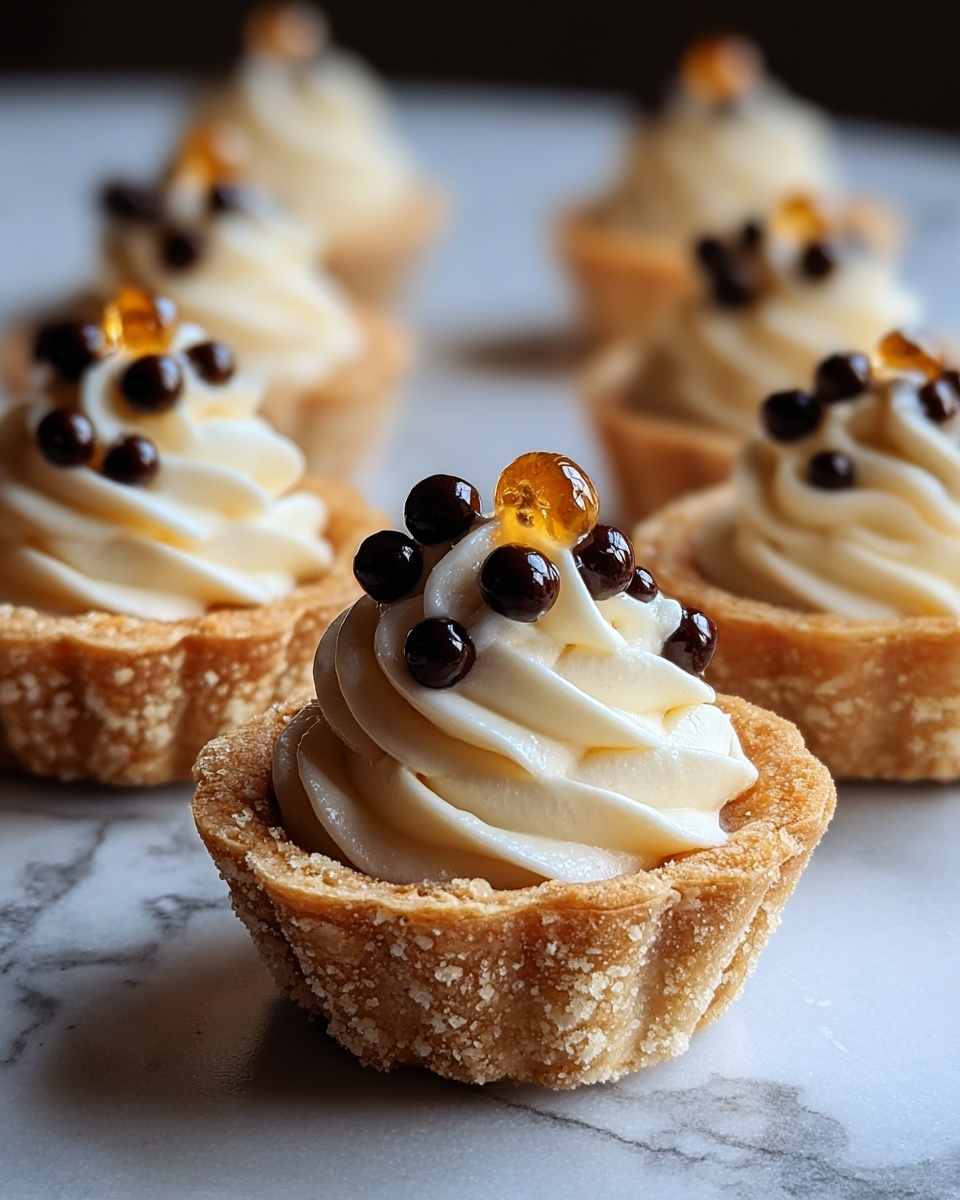
If you have a sweet tooth and a love for Italian pastries, the Mini Cannoli Cups Recipe is about to become your new favorite dessert hack. Imagine all the creamy, zesty goodness of classic cannoli filling tucked inside perfectly crisp, bite-sized cups, making it easier than ever to share and enjoy. These little treats are just the right balance of crunchy texture and velvety ricotta sweetness, with hints of citrus and a sprinkle of chocolate chips or pistachios to bring it all together. Whether you’re hosting a gathering or simply craving a bite-sized indulgence, this Mini Cannoli Cups Recipe delivers charm, flavor, and simplicity all in one delicious package.

Ingredients You’ll Need
These ingredients come together with ease to create a stunning dessert that feels special but is surprisingly straightforward. Each item plays a vital role: the ricotta provides creamy richness, the citrus zest adds brightness, and the pie crust forms the perfect crunchy base.
- Whole-milk ricotta cheese: Choose a creamy, fresh ricotta for the best texture and flavor in the filling.
- Powdered sugar: Adds smooth sweetness and helps balance the richness of ricotta.
- Granulated sugar: Provides a slight crunch and depth to the filling.
- Orange or lemon zest: Gives a bright, refreshing citrus note that lifts the dessert.
- Vanilla extract: Enhances the overall flavor with its warm, fragrant touch.
- Refrigerated pie crusts: The easy shortcut for the crisp, tender cups holding the creamy filling.
- Turbinado sugar (raw sugar): Sprinkled for extra crunch and a hint of molasses flavor.
- Ground cinnamon: Adds warmth and a subtle spice, perfectly complementing the sweetness.
- Miniature semisweet chocolate chips or finely chopped pistachios: Offers delightful texture contrast and a decorative finish.
- Additional powdered sugar: For dusting the finished cups and adding that elegant final touch.
How to Make Mini Cannoli Cups Recipe
Step 1: Prepare the Cannoli Cups
Start by preheating your oven to 375°F (190°C) and greasing your mini muffin tin lightly. This prep ensures your crispy little cups will come out easy and golden brown.
Step 2: Cut the Dough Circles
Roll out the refrigerated pie crusts on a clean, flat surface. Use a round cutter about 3 inches in diameter to cut out perfect dough circles, which will become the shell of each mini cup.
Step 3: Form the Cups
Gently press each dough circle into the mini muffin tin wells. Use a fork to prick the bottom of each cup. This crucial step keeps your dough from puffing up in the oven and helps retain that classic cup shape.
Step 4: Add a Cinnamon Sugar Sprinkle
Mix turbinado sugar and ground cinnamon together, then sprinkle the mixture evenly over your dough cups. This adds a lovely hint of spice and a caramelized crunch once baked.
Step 5: Bake the Cups
Bake your cups for 8 to 10 minutes until they achieve a golden brown, crisp finish. Once baked, let them cool completely in the tin to maintain their shape and texture.
Step 6: Make the Ricotta Filling
While the cups cool, whisk together the whole-milk ricotta, powdered sugar, granulated sugar, citrus zest, and vanilla extract until smooth. For a lighter consistency, feel free to add a tablespoon or two of heavy cream.
Step 7: Assemble the Mini Cannoli Cups Recipe
Fill each cooled cannoli cup with the luscious ricotta mixture. You can spoon the filling in or use a pastry bag for a more polished look. This is where the magic comes together into those delightful, bite-sized cannoli cups.
Step 8: Garnish and Dust
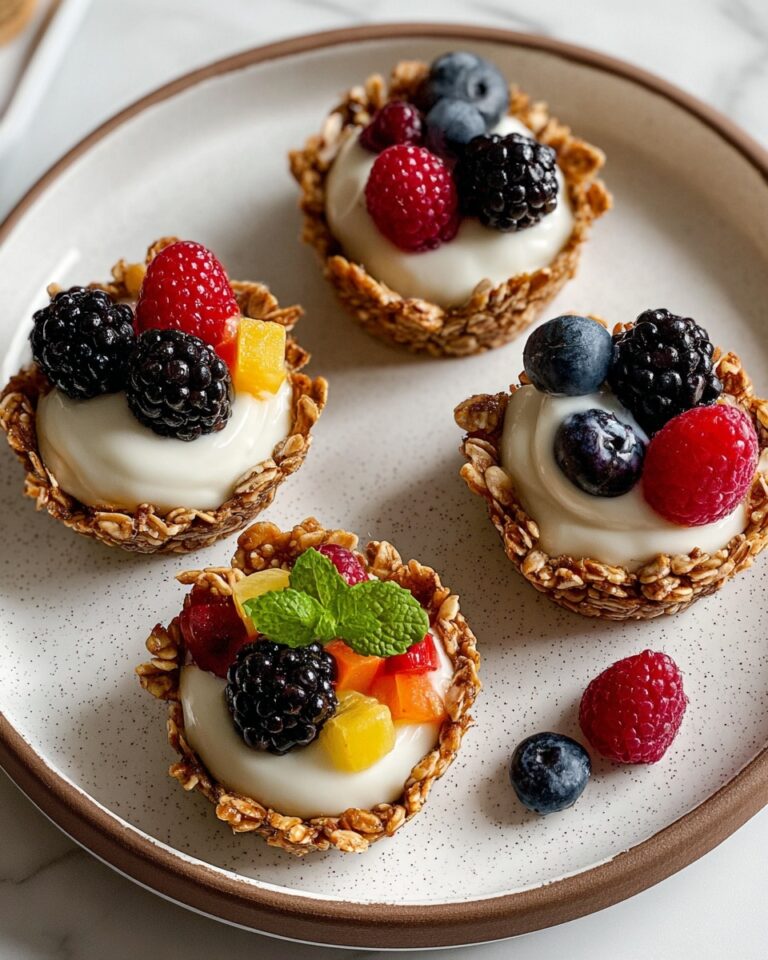
Sprinkle miniature chocolate chips or chopped pistachios over the ricotta filling. Finish with a dusting of powdered sugar for that irresistible, classic cannoli appearance.
Step 9: Serve and Enjoy
Serve your beautiful Mini Cannoli Cups right away, or chill them in the fridge for up to two hours to let the flavors meld and the filling set just perfectly.
How to Serve Mini Cannoli Cups Recipe
Garnishes
While the chocolate chips or pistachios are traditional favorites, you can sprinkle crushed candied orange peel or shredded toasted coconut for a fun twist. These garnishes add extra flavor and color, elevating the visual appeal and taste.
Side Dishes
Mini Cannoli Cups are perfect as a sweet finish alongside fresh fruit like berries or a light espresso for a complete Italian-inspired dessert experience. They pair beautifully with a glass of dessert wine for a special occasion.
Creative Ways to Present
Arrange your Mini Cannoli Cups on a beautiful serving platter lined with fresh mint leaves or edible flowers. For parties, presenting them in a tiered dessert stand adds an elegant touch that will wow your guests and invite everyone to dig in.
Make Ahead and Storage
Storing Leftovers
If you have leftovers, keep the mini cannoli cups in an airtight container in the refrigerator. It’s best to store the cups and filling separately if possible to avoid the crusts from becoming soggy.
Freezing
You can freeze the baked dough cups without filling for up to one month. Just thaw at room temperature before filling. The ricotta filling is best made fresh, but if you freeze it, thaw gently in the fridge and whisk before using.
Reheating
Reheat the baked cups briefly in a warm oven to restore their crispiness if needed. Never microwave the filled cannoli cups, as the filling will not maintain its texture and the crust will become soggy.
FAQs
Can I make Mini Cannoli Cups Recipe dairy-free?
Yes, you can substitute the ricotta with a dairy-free cream cheese or a plant-based ricotta alternative, but the texture and flavor might be slightly different from the classic version.
How long do these mini cannoli cups stay fresh?
When stored properly in the refrigerator, they’re best enjoyed within 1 to 2 days for optimal crispness and freshness.
Can I use homemade pie crust instead of refrigerated?
Absolutely! Homemade pie crust can add a wonderful buttery flavor, just roll it out to about the same thickness and size as directed for the refrigerated crusts.
What if I don’t have a mini muffin tin?
If you don’t have a mini muffin tin, try using a mini tart pan or small cupcake liners placed in a muffin tin to help shape the cups while baking.
Can I prepare the filling in advance?
Yes, the ricotta filling can be made a day ahead and stored in the fridge. Just give it a good stir before filling the cups to restore the creamy texture.
Final Thoughts
If you’re longing for a dessert that’s simple but makes a big impression, I wholeheartedly encourage you to try the Mini Cannoli Cups Recipe. It captures all the joy of traditional cannoli in a fuss-free, fun-sized bite that’s perfect for any occasion. Once you experience how easy and delicious these are, they’ll definitely become a beloved staple in your baking repertoire. Happy baking and even happier eating!
Print
Mini Cannoli Cups Recipe
- Prep Time: 20 minutes
- Cook Time: 10 minutes
- Total Time: 30 minutes
- Yield: 24 mini cannoli cups
- Category: Dessert
- Method: Baking
- Cuisine: Italian
Description
These Mini Cannoli Cups are a delightful twist on the traditional Italian dessert, featuring crispy baked pie crust cups filled with a creamy, sweet ricotta mixture flavored with citrus zest and vanilla. Topped with mini chocolate chips or pistachios and a dusting of powdered sugar, they’re perfect bite-sized treats for any occasion.
Ingredients
For the Cannoli Cups
- 1 box (2 count) refrigerated pie crusts, softened as directed on box
- 3 tablespoons turbinado sugar (raw sugar)
- 1 teaspoon ground cinnamon
- Additional powdered sugar (for dusting)
For the Ricotta Filling
- 1 container (15 oz) whole-milk ricotta cheese
- 1/2 cup powdered sugar
- 2 tablespoons granulated sugar
- 1 teaspoon finely grated orange or lemon zest
- 1/2 teaspoon vanilla extract
- Optional: 1-2 tablespoons heavy cream (for thinning filling, if needed)
- 1/4 cup miniature semisweet chocolate chips or finely chopped pistachios
Instructions
- Prepare the Cannoli Cups: Preheat your oven to 375°F (190°C) and lightly grease a mini muffin tin to prevent sticking.
- Cut Dough Circles: Roll out the refrigerated pie crusts on a flat surface. Use a 3-inch round cutter to cut out circles of dough.
- Form Cups: Gently press each dough circle into the mini muffin tin cavities to create small cups. Prick the bottom of each cup with a fork to prevent puffing up during baking.
- Add Sugar and Cinnamon: In a small bowl, combine the turbinado sugar and ground cinnamon. Sprinkle this mixture evenly over the dough cups for a sweet, spiced crust.
- Bake the Cups: Bake for 8-10 minutes, or until the cups are golden brown and crisp. Remove from the oven and allow them to cool completely in the tin before filling.
- Make the Filling: In a medium bowl, combine the whole-milk ricotta cheese, powdered sugar, granulated sugar, grated citrus zest, and vanilla extract. Stir well until smooth and creamy. If the filling is too thick, add 1-2 tablespoons of heavy cream to reach your preferred consistency.
- Fill the Cups: Once the cannoli cups have cooled, fill each cup with the ricotta mixture using a spoon or a pastry bag for neatness.
- Garnish: Sprinkle the tops of the filled cups with miniature semisweet chocolate chips or finely chopped pistachios for added texture and flavor.
- Dust with Powdered Sugar: Lightly dust the filled cannoli cups with additional powdered sugar for a beautiful finish.
- Serve and Enjoy: Serve the mini cannoli cups immediately, or refrigerate for up to 2 hours to allow the filling to set before serving.
Notes
- If the ricotta filling seems too thick, gently thin it with heavy cream for easier filling.
- You can substitute lemon zest for orange zest depending on your preferred flavor profile.
- These mini cannoli cups are best served fresh but can be refrigerated up to 2 hours prior to serving.
- Using a pastry bag to fill the cups helps achieve a cleaner presentation.
- You may use pistachios instead of chocolate chips for a nutty variation.


