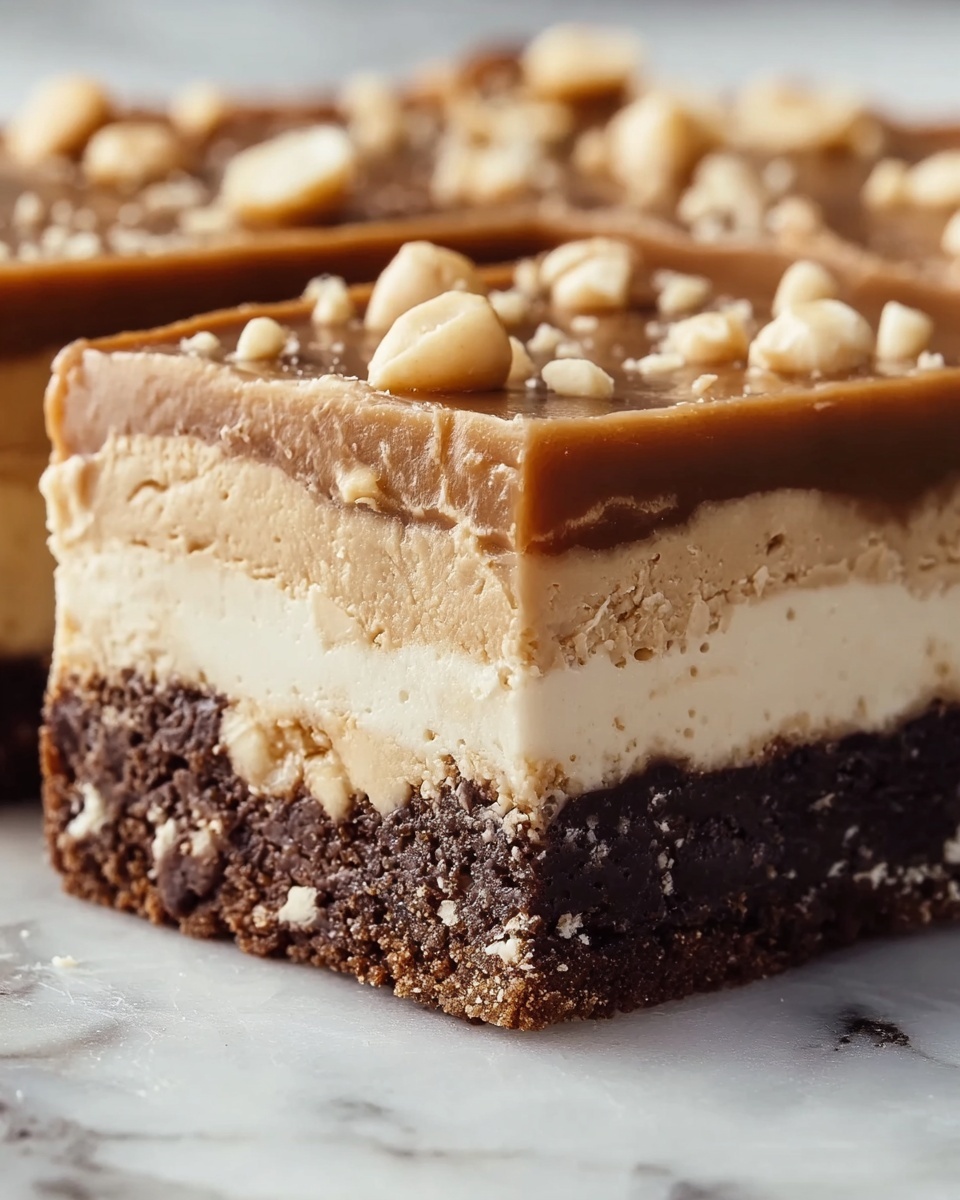
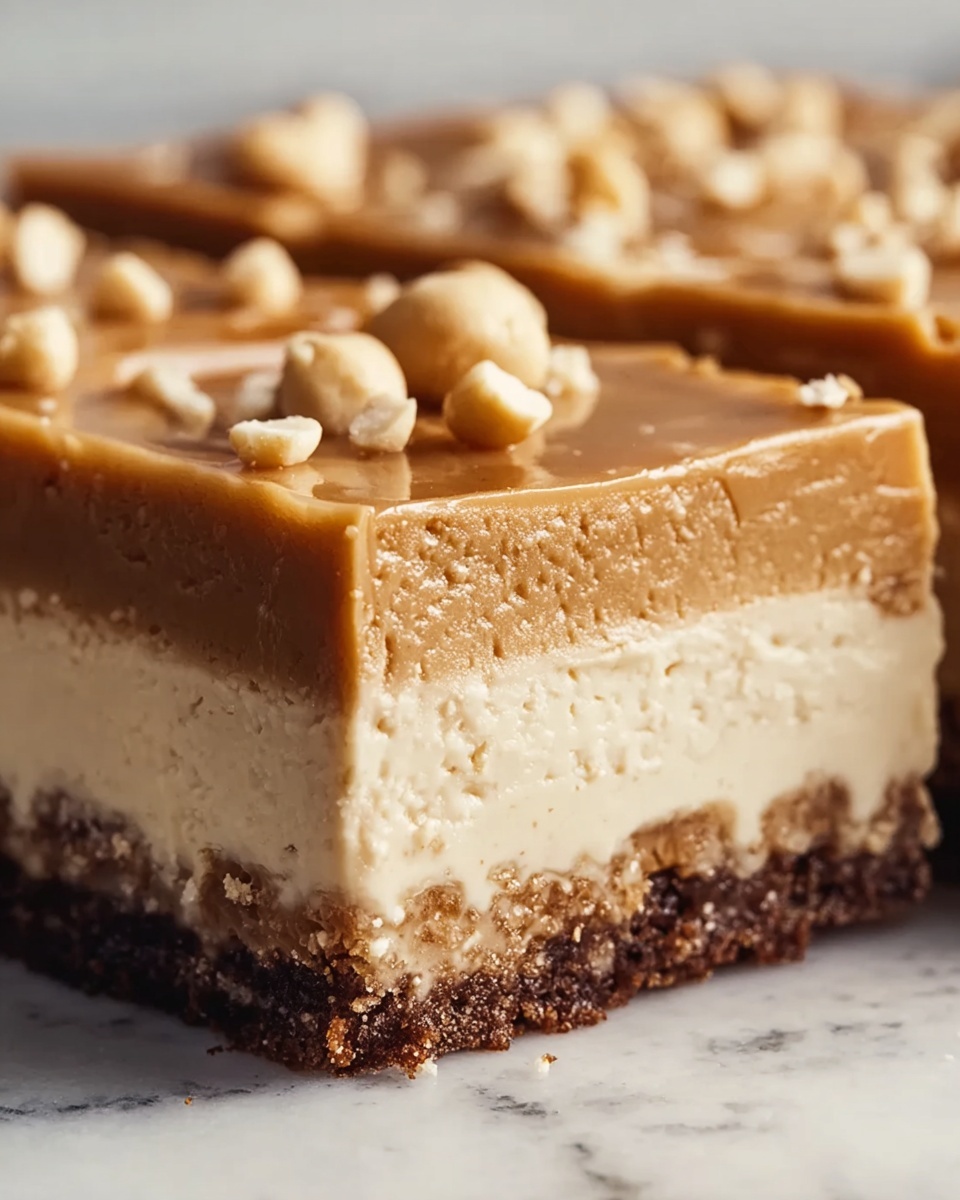
If you have a serious sweet tooth and love the irresistible combo of chocolate and peanut butter, then you’re going to fall head over heels for this Peanut Butter Dream Bars Recipe. These bars are the perfect treat with a buttery graham cracker crust, a rich and creamy peanut butter middle, and a smooth chocolate topping that sets just right for that dreamy texture. Every bite is a symphony of flavors and textures that will have you sneaking back for seconds, thirds, or well… just one more. This recipe is straightforward, quick to put together, and makes enough to share—though you might find it hard to give these bars away.
Ingredients You’ll Need
All you need to create these luscious bars are a handful of simple ingredients that come together beautifully to make a decadent yet balanced dessert. Each ingredient plays its role, whether it’s the buttery crunch of graham crackers or the silky chocolate that crowns the bars.
- 1 1/2 cups graham cracker crumbs: The foundation of the crust provides a buttery and flavorful base with a satisfying crunch.
- 1/4 cup granulated sugar: Adds just the right amount of sweetness to the crust to complement the peanut butter.
- 1/2 cup unsalted butter, melted: Binds the crumbs together and brings a rich, mellow flavor.
- 1 cup creamy peanut butter: The star of the filling for that smooth, nutty, and ultra-creamy texture.
- 1 cup powdered sugar: Sweetens the peanut butter filling and helps achieve a melt-in-your-mouth feel.
- 1/4 cup unsalted butter, softened: Gives the peanut butter layer a richer texture and balances sweetness.
- 1 teaspoon vanilla extract: Adds depth and aromatic warmth to the filling.
- 1/2 cup heavy cream (or milk): Lightens the filling for a fluffy, dreamy consistency.
- 1 cup semisweet chocolate chips: For the top layer, delivering that luscious chocolate punch.
- 2 tablespoons unsalted butter: Combined with chocolate chips to make a glossy, smooth topping.
How to Make Peanut Butter Dream Bars Recipe
Step 1: Prepare the Crust
Start by combining the graham cracker crumbs, granulated sugar, and melted butter in a medium bowl. Mix thoroughly until every crumb is coated and the mixture holds together when pressed. This step is essential because it ensures a crust that’s both crispy and buttery, setting the perfect stage for the peanut butter filling.
Step 2: Press and Chill the Crust
Press the crumb mixture evenly into the bottom of a lined or greased square baking pan. Use the back of a spoon or a flat-bottomed glass to compact it firmly. Chilling the crust in the refrigerator for about 10 minutes will help it set and keep it from crumbling when you add the next layers.
Step 3: Mix the Peanut Butter Filling
In a separate bowl, beat together the creamy peanut butter, powdered sugar, softened butter, and vanilla extract until smooth and well blended. Then, gradually add the heavy cream or milk, beating until the filling is fluffy and light. This part is where the filling really becomes dreamy — silky, sweet, and irresistibly peanut buttery.
Step 4: Spread the Peanut Butter Layer
Once the crust is chilled and firm, spread the peanut butter filling evenly over it. Use a spatula to smooth it out so that the layer is uniform, ensuring each bar has that perfect balance of crust and filling in every bite.
Step 5: Prepare the Chocolate Topping
Gently melt the chocolate chips and 2 tablespoons of unsalted butter together, either in a microwave using short bursts or over a double boiler. Stir until the mixture is glossy and smooth, then pour it carefully over the peanut butter layer. Tilt the pan if needed to evenly coat the surface with a luscious chocolate blanket.
Step 6: Chill and Set the Bars
Refrigerate the bars for at least 1 hour to allow the chocolate topping to set perfectly and for the flavors to meld together. Once firm, you can slice the bars into squares and get ready to indulge.
How to Serve Peanut Butter Dream Bars Recipe

Garnishes
These bars are stunning on their own, but a sprinkle of crushed peanuts or a light dusting of powdered sugar can add a bit of extra texture or a hint of elegance. If you want to get fancy, drizzle a bit of melted white chocolate over the top for a gorgeous contrast.
Side Dishes
Serve your Peanut Butter Dream Bars Recipe alongside a scoop of vanilla ice cream or a dollop of whipped cream for a full-on dessert experience. Fresh berries add a tart balance to the rich flavors, or pair with a cold glass of milk to cut through the sweetness perfectly.
Creative Ways to Present
To wow your guests, try serving individual bars with small skewers of fresh fruit or mini dollops of peanut butter whipped cream. Alternatively, create a layered dessert parfait using crumbled bars, whipped cream, and chocolate sauce in clear glasses — all the Peanut Butter Dream Bars flavors, but with a fun twist.
Make Ahead and Storage
Storing Leftovers
You can keep leftover bars in an airtight container in the refrigerator for up to 5 days. This keeps them fresh and maintains the firm but tender texture that makes these treats so special.
Freezing
If you want to save some for later, the bars freeze beautifully. Wrap them tightly in plastic wrap and then foil or place in a freezer-safe container. Freeze for up to 2 months. Thaw in the refrigerator before serving for the best texture and flavor.
Reheating
Generally, these bars are best enjoyed cool or at room temperature. If you prefer to warm them slightly, pop a bar in the microwave for about 10 seconds to soften the chocolate just a bit, but be careful not to melt it completely.
FAQs
Can I use crunchy peanut butter instead of creamy?
Absolutely! Crunchy peanut butter will add a delightful texture to the filling, giving your bars a bit of extra crunch along with the creamy richness. It’s a great way to customize the bars to your taste.
Do I have to use heavy cream or can I substitute milk?
You can substitute milk for heavy cream if that’s what you have on hand. The filling may be slightly less rich and fluffy but will still taste fantastic and hold together nicely.
Can I make these bars vegan?
To make a vegan version, use a plant-based butter and dairy-free chocolate chips, and replace the heavy cream with coconut cream or another non-dairy alternative. The peanut butter layer will still deliver all the deliciousness those bars are known for.
What’s the best way to cut these bars cleanly?
Use a sharp knife and for best results, wipe the blade clean between cuts. Chilling the bars thoroughly before slicing also helps to keep the edges neat and prevents the layers from smudging.
Can I add nuts or other toppings inside the bars?
Definitely! Mixing in chopped peanuts, chocolate chips, or even a swirl of caramel to the peanut butter filling can add exciting flavors and textures. Get creative and make this Peanut Butter Dream Bars Recipe your own!
Final Thoughts
This Peanut Butter Dream Bars Recipe is truly one of those desserts that feels like a warm hug — rich, comforting, and utterly delightful. It’s simple enough to whip up anytime yet impressive enough to serve at gatherings. I can’t wait for you to try it and discover how easily these bars become your new favorite treat. Go ahead, treat yourself—you deserve a little sweetness today!
Print
Peanut Butter Dream Bars Recipe
- Prep Time: 15 minutes
- Cook Time: 0 minutes
- Total Time: 1 hour 15 minutes
- Yield: 16 servings
- Category: Dessert
- Method: No-Cook
- Cuisine: American
Description
Peanut Butter Dream Bars are a no-bake dessert featuring a crunchy graham cracker crust, a creamy peanut butter filling, and a rich chocolate topping. Easy to prepare and perfect for satisfying your sweet tooth, these bars combine creamy, crunchy, and chocolaty textures in every bite.
Ingredients
Crust
- 1 1/2 cups graham cracker crumbs
- 1/4 cup granulated sugar
- 1/2 cup unsalted butter, melted
Peanut Butter Filling
- 1 cup creamy peanut butter
- 1 cup powdered sugar
- 1/4 cup unsalted butter, softened
- 1 teaspoon vanilla extract
- 1/2 cup heavy cream (or milk)
Chocolate Topping
- 1 cup semisweet chocolate chips
- 2 tablespoons unsalted butter
Instructions
- Prepare the crust: In a medium bowl, combine the graham cracker crumbs and granulated sugar. Stir in the melted butter until the mixture is evenly moistened.
- Press the crust: Transfer the crust mixture into an 8×8 inch baking dish. Press firmly and evenly into the bottom to form a solid crust layer.
- Chill the crust: Place the baking dish in the refrigerator to chill for about 15 minutes, allowing the crust to set while you prepare the filling.
- Mix the peanut butter filling: In a large bowl, beat together the creamy peanut butter, powdered sugar, softened butter, and vanilla extract until smooth and creamy.
- Add the cream: Slowly add the heavy cream (or milk) to the peanut butter mixture and continue to beat until the filling is light and fluffy.
- Spread the filling: Remove the chilled crust from the refrigerator and evenly spread the peanut butter filling over the crust layer.
- Melt the chocolate: In a microwave-safe bowl, combine the semisweet chocolate chips and 2 tablespoons of butter. Microwave in 30-second intervals, stirring in between, until the chocolate is completely melted and smooth.
- Spread the chocolate topping: Pour the melted chocolate mixture evenly over the peanut butter filling, spreading it gently with a spatula.
- Chill the bars: Return the assembled bars to the refrigerator and chill for at least 1 hour or until the chocolate topping is firm and set.
- Cut and serve: Once set, cut the bars into 16 equal pieces and serve chilled for the best texture and flavor.
Notes
- You can substitute milk for heavy cream to lighten the filling, though the texture may be slightly less rich.
- For easier cutting, warm the knife under hot water and dry it before slicing the bars.
- Store bars in an airtight container in the refrigerator for up to 5 days.
- For a crunchy variation, add chopped peanuts to the peanut butter filling.


