Get ready to wow your friends and family with these irresistibly fun and festive cupcakes because this Stamped Halloween Cupcakes – A Spooky Treat with Four Fun Designs Recipe is everything you need to bring spooky season to life in the most delightful way. Each cupcake is a mini masterpiece featuring four different Halloween characters — from mummies to monsters, Frankensteins to vampires — all decorated with playful stamped designs and creative toppings. The rich chocolate flavor paired with luscious fillings and colorful frosting makes every bite a celebration, perfect for parties, classroom treats, or just a cozy night in with the kids. Halloween has never looked or tasted this good!
Ingredients You’ll Need
These ingredients are the magic behind the scene, simple yet so essential to create not only the perfect cupcake base but also the vibrant, tasty decorations that bring each spooky character to life. Each one adds depth to the texture, richness to the flavor, and a pop of color that just screams Halloween fun!
- 8 oz semi-sweet chocolate, finely chopped: Brings a luscious, deep chocolate flavor that makes the cupcakes rich without being too sweet.
- 2 oz coconut oil (or vegetable oil): Adds moistness and a subtle tropical hint to the cupcakes.
- 1 cup coffee or water (8 fl oz): Coffee enhances the chocolate notes, while water keeps it simple if you prefer.
- 2 large eggs, room temperature: Provide structure and help bind all ingredients together seamlessly.
- 1 cup buttermilk (8 fl oz), room temperature: Adds tenderness and a slight tang to balance the sweetness.
- 1 tsp vanilla extract: Brightens the flavors and gives a lovely aroma.
- 1 cup granulated sugar (7 oz): Sweetens just right to keep everything balanced.
- 2 cups all-purpose flour (9 oz): The sturdy base that guides the texture to be soft but not crumbly.
- 2/3 cup unsweetened cocoa powder (2 oz): Packs that essential chocolate punch.
- 1 tsp baking powder: Helps the cupcakes rise beautifully.
- 1 tsp baking soda: Works with the buttermilk to give lift and softness.
- 1/2 tsp salt: Balances sweetness and enhances chocolate flavor.
- 8 oz unsalted butter, room temperature: Provides richness and creaminess for the frosting.
- 6 cups powdered sugar (24 oz): Sweetens and thickens the frosting perfectly.
- 6-8 tbsp heavy cream (or milk): Controls frosting consistency, keeping it light and pipeable.
- 1/4 tsp salt: Means the frosting isn’t one-dimensional, elevating flavor.
- 1 tsp vanilla extract: Adds warmth and complexity to the frosting.
- Assorted gel food coloring (purple, green, yellow, orange, blue, etc.): Let your creativity flow with vibrant cupcake decorations.
- 24 candy eyeballs: Playful focal points that make each character pop!
- 1 can cherry pie filling (for vampires): Adds a deliciously spooky “blood” surprise inside.
- 1 cup bone-shaped sprinkles (for mummies): Perfectly themed and crunchy little treasures.
- 1 cup chocolate jimmies (for Frankensteins): Great for creating signature hair textures.
- Candy fangs (for vampires): The perfect finishing touch for creepy-cool smiles.
- Chocolate chews (like Tootsie Rolls): Molded into bolts to complete your Frankenstein’s look.
- Fruit chews (like Starburst or Laffy Taffy): Used creatively for monster noses and mouths.
- Colored licorice (for monsters): Adds flair and dimension, especially around ears and smiles.
- Gummy rings (for monsters): Fun, chewy accents that bring monsters to life.
- Red string licorice (for Frankensteins): Shapes into smiles and stitches for that final spooky effect.
How to Make Stamped Halloween Cupcakes – A Spooky Treat with Four Fun Designs Recipe
Step 1: Preheat and Prepare
Begin by preheating your oven to 325°F (163°C), making sure it’s the perfect temperature for even baking. Grease two jumbo muffin tins with nonstick spray and line the bottoms with parchment paper squares to ensure your cupcakes pop out effortlessly without sticking.
Step 2: Melt the Chocolate
In a microwave-safe bowl, gently melt the semi-sweet chocolate and coconut oil together. Heat in 1-minute increments, stirring each time until smooth and fully combined. Allow it to cool to room temperature so it won’t scramble your eggs or buttermilk in the next step.
Step 3: Combine the Wet Ingredients
Whisk together the melted chocolate mixture with coffee (or water), eggs, buttermilk, vanilla, and sugar in a large bowl until everything is thoroughly combined and smooth. This creates a rich, moist base for your cupcakes, already smelling fantastic!
Step 4: Sift and Mix Dry Ingredients
In a separate bowl, sift together flour, cocoa powder, baking powder, baking soda, and salt. Sifting is key here to avoid lumps and to help your cupcakes bake up light and tender.
Step 5: Combine Wet and Dry
Gradually add the dry ingredients to the wet, mixing just until combined. The batter will look a bit lumpy at first, but don’t fear — scraping down the bowl and mixing on medium-low speed for two minutes will give you a beautifully smooth cupcake batter.
Step 6: Bake the Cupcakes
Fill each prepared muffin cavity about two-thirds full with batter. Bake for 25 to 28 minutes or until the cupcake tops spring back lightly when pressed. When done, let them cool completely on a wire rack before moving on to the fun part: decorating!
Step 7: Prepare the Frosting
Beat the butter on medium speed for 1 to 2 minutes until creamy and fluffy. Gradually add powdered sugar, 6 tablespoons of heavy cream, salt, and vanilla extract, then whip until light and airy. Adjust the cream amount to achieve your preferred consistency that’s perfect for piping and spreading.
Step 8: Fill the Cupcakes
Cut a small cone-shaped hole in the center of each cupcake. For mummies, fill with bone-shaped sprinkles; for monsters, fill with colored frosting matched to the theme; vampires get a bold cherry pie filling “blood” surprise; Frankensteins are filled with green frosting. Replace the tops to seal in the surprise.
Step 9: Decorate Each Character
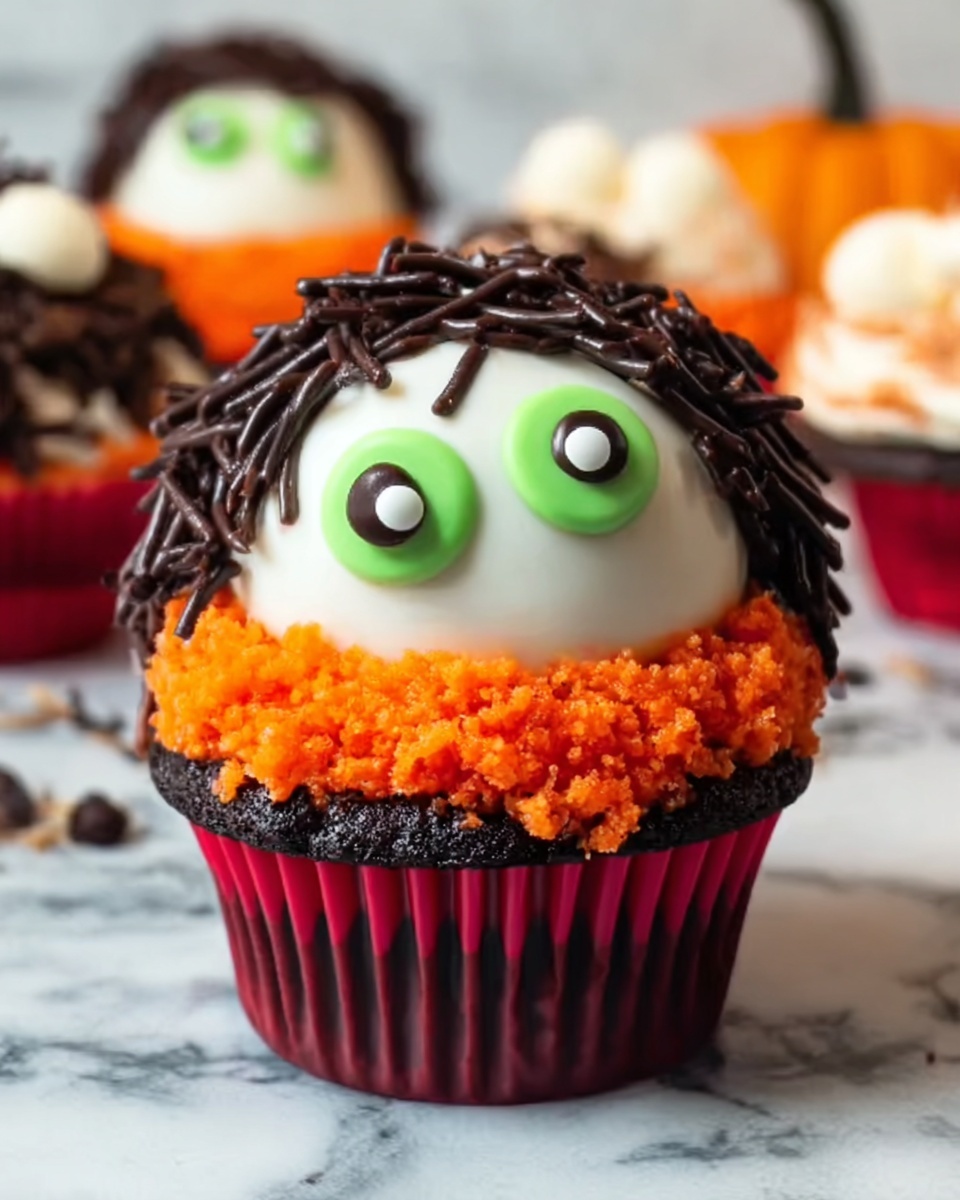
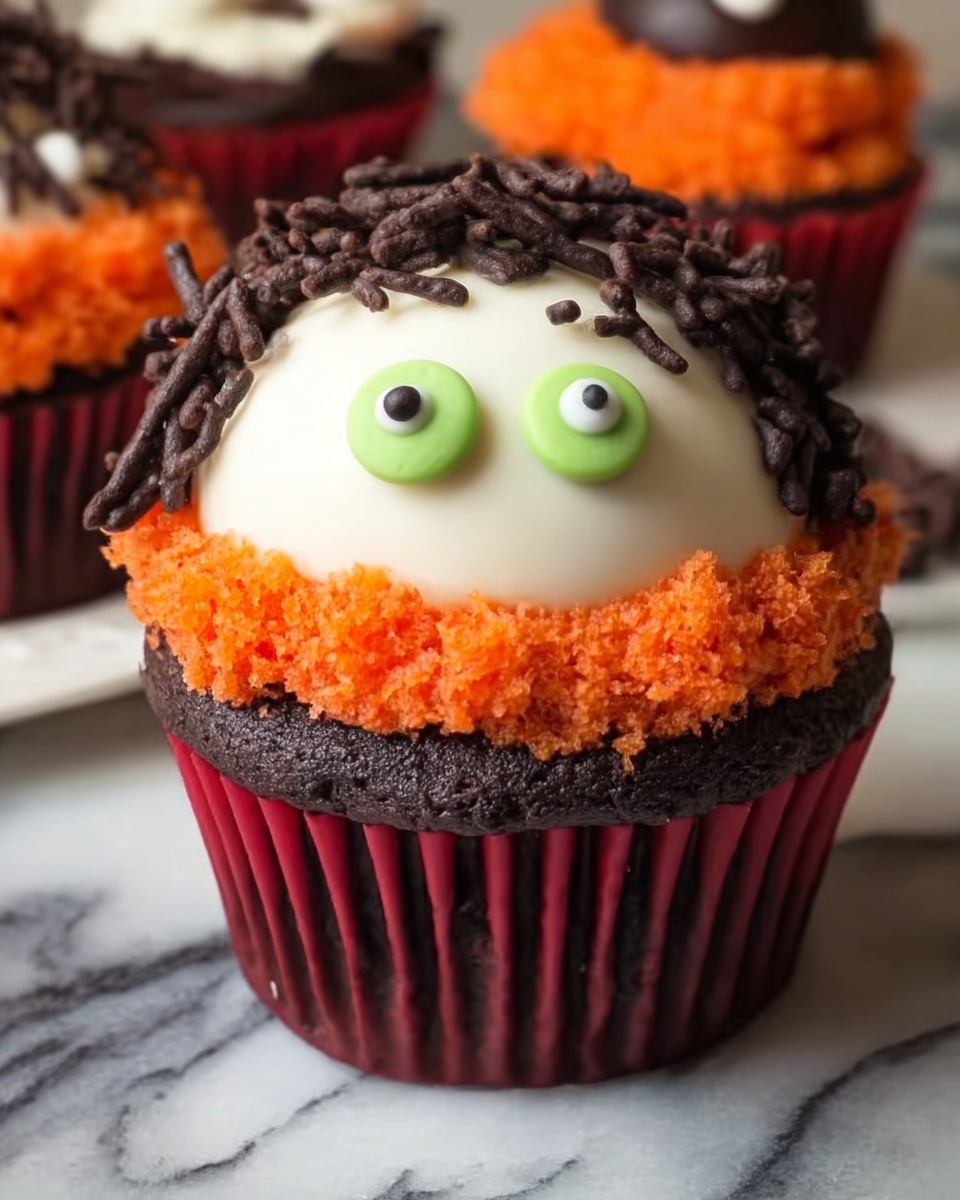
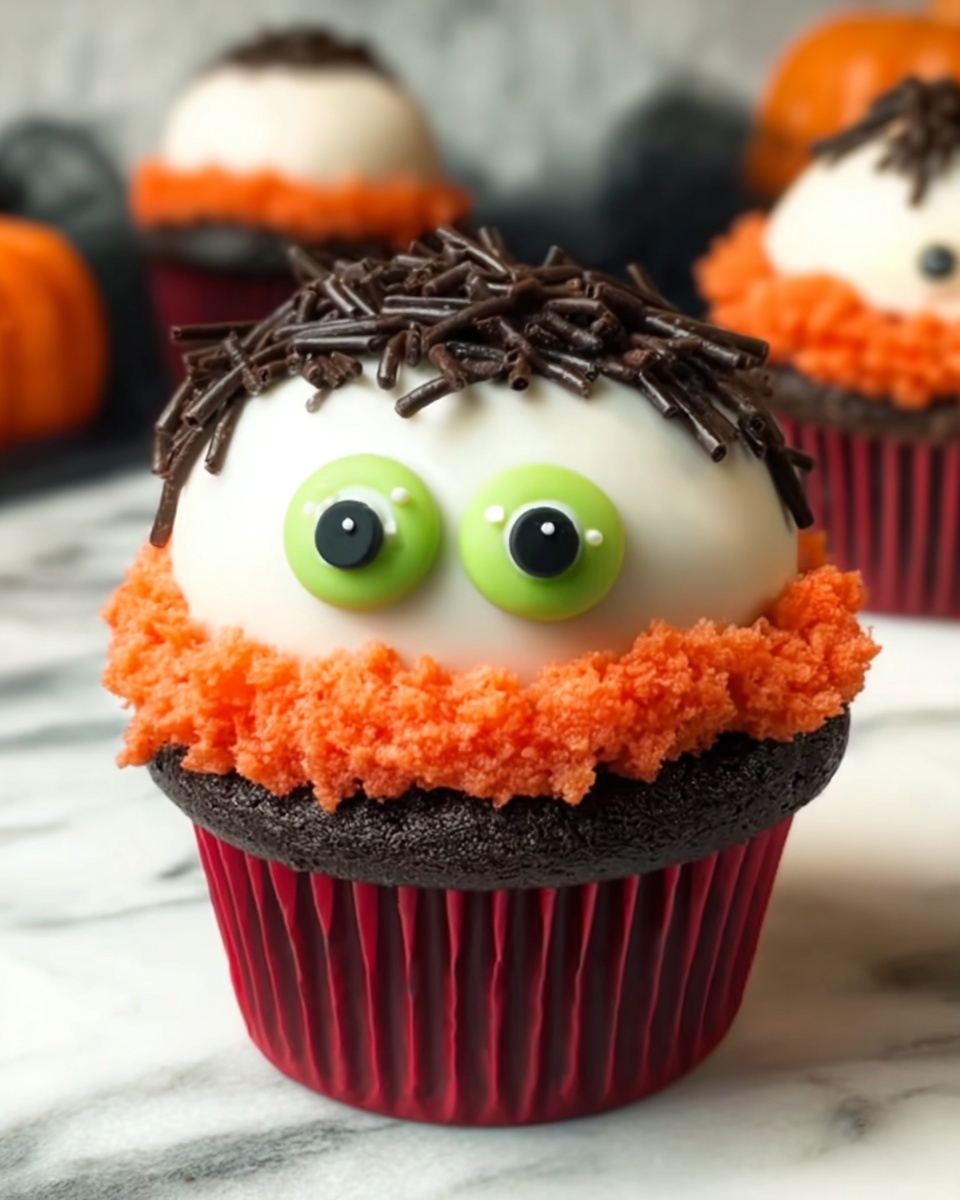
Now the magic happens! Pipe frosting in crisscross patterns to mimic mummy bandages, leaving spaces for candy eyeballs. Create monster “fur” using grass tips and adorn with candy eyes, fruit chews, and licorice. Swirl white frosting over the cherry-filled vampire cupcakes and add candy fangs and dripping red details. Finish Frankensteins with chocolate jimmies hair, candy eyes, red licorice smiles, and chocolate chew “bolts” on the sides. Each design tells its own spooky story and is fun to assemble.
How to Serve Stamped Halloween Cupcakes – A Spooky Treat with Four Fun Designs Recipe
Garnishes
Adding garnishes not only makes these cupcakes visually stunning but also adds textures and flavors that surprise with every bite. Candy eyeballs, licorice pieces, gummy rings, and cherry pie filling are all simple but transform your cupcakes into Halloween spectacles that delight kids and adults alike.
Side Dishes
Serve these cupcakes alongside warm apple cider or a rich hot chocolate for a cozy fall dessert table that surely will be the centerpiece. Spicy pumpkin muffins or a light fruit salad with autumn spices also complement the chocolatey richness perfectly without overpowering the cupcakes’ creativity.
Creative Ways to Present
Go full Halloween vibe by arranging your cupcakes on a crackled black platter or a rustic wooden tray lined with faux spider webs. Use themed cupcake liners and place tiny printed Halloween flags next to each character to highlight their names. You can even set up a cupcake decorating station for guests to add their own twist — such fun!
Make Ahead and Storage
Storing Leftovers
Keep leftover cupcakes fresh by storing them in an airtight container at room temperature for up to two days. If your kitchen is particularly warm, refrigerate them instead to prevent frosting melt-down, but remember to bring them to room temperature before serving for best flavor and texture.
Freezing
You can freeze these cupcakes either before or after decorating. Wrap them individually in plastic wrap and place in a freezer bag for up to three months. When ready to eat, thaw in the refrigerator overnight and bring to room temperature before serving.
Reheating
Warm cupcakes slightly by letting them sit at room temperature if frozen. Avoid microwaving decorated cupcakes to preserve the look and texture of the frosting and candies. If you must warm, do so for just a few seconds on low power and enjoy immediately.
FAQs
Can I use regular butter instead of unsalted butter for frosting?
Yes, you can use salted butter as a substitute. Just reduce or omit the additional salt in the frosting recipe to keep the flavor balanced.
What if I don’t have gel food coloring?
You can use liquid food coloring, but gel colors provide more vibrant hues without changing frosting consistency. If using liquid, add sparingly to avoid thinning the frosting.
Are the cupcakes suitable for freezing after filling but before decorating?
Absolutely! Freeze after filling and topping the cupcakes with the crumb layer of frosting, then decorate fresh after thawing for a flawless finish.
Can I substitute coconut oil with another oil?
Vegetable oil or canola oil are great substitutes if you prefer no coconut flavor. They keep the cupcakes moist and tender without altering the taste much.
Is the coffee flavor noticeable in the cupcakes?
No worries if you’re not a coffee fan! The coffee enhances the chocolate flavor subtly, but the taste is mild enough that those sensitive to coffee won’t notice it prominently.
Final Thoughts
Making these Stamped Halloween Cupcakes – A Spooky Treat with Four Fun Designs Recipe is such a joy, and sharing them makes Halloween celebrations extra special and memorable. With their rich flavor and playful decorations, they’re guaranteed to become a new seasonal favorite. So gather your ingredients, roll up your sleeves, and dive into the delightful world of spooky sweets — your friends and family will thank you!
Print
Stamped Halloween Cupcakes – A Spooky Treat with Four Fun Designs Recipe
- Prep Time: 1 hour
- Cook Time: 28 minutes
- Total Time: 1 hour 28 minutes
- Yield: 24 jumbo cupcakes
- Category: Dessert
- Method: Baking
- Cuisine: American
Description
Celebrate Halloween with these fun and spooky stamped cupcakes featuring four creative designs: mummies, monsters, vampires, and Frankensteins. Rich chocolate cupcakes are filled and decorated with themed candies, colorful frostings, and clever details to delight both kids and adults alike. Perfect for Halloween parties or festive treats.
Ingredients
Cupcake Batter
- 8 oz semi-sweet chocolate, finely chopped
- 2 oz coconut oil (1/4 cup) or substitute vegetable oil
- 1 cup coffee or water (8 fl oz)
- 2 large eggs, room temperature
- 1 cup buttermilk (8 fl oz), room temperature
- 1 tsp vanilla extract
- 1 cup granulated sugar (7 oz)
- 2 cups all-purpose flour (9 oz)
- 2/3 cup unsweetened cocoa powder (2 oz)
- 1 tsp baking powder
- 1 tsp baking soda
- 1/2 tsp salt
Buttercream Frosting
- 8 oz unsalted butter, room temperature
- 6 cups powdered sugar (24 oz)
- 6–8 tbsp heavy cream or milk
- 1/4 tsp salt
- 1 tsp vanilla extract
- Assorted gel food coloring (purple, green, yellow, orange, red)
Decorations and Fillings
- 24 candy eyeballs
- 1 can cherry pie filling (for vampire cupcakes)
- 1 cup bone-shaped sprinkles (for mummy cupcakes)
- 1 cup chocolate jimmies (for Frankenstein cupcakes)
- Candy fangs (for vampire cupcakes)
- Chocolate chews like Tootsie Rolls
- Fruit chews like Starburst or Laffy Taffy
- Colored licorice (for monster cupcakes)
- Gummy rings (for monster cupcakes)
- Red string licorice (for Frankenstein cupcakes)
Instructions
- Preheat Oven: Preheat your oven to 325°F (163°C). Prepare two jumbo muffin tins by spraying them with nonstick spray and placing a square of parchment paper at the bottom of each cavity to prevent sticking.
- Melt Chocolate: Combine the chopped semi-sweet chocolate and coconut oil in a microwave-safe bowl. Microwave in 1-minute increments, stirring after each, until the chocolate mixture is fully melted and smooth. Allow it to cool to room temperature before using.
- Mix Wet Ingredients: In a large mixing bowl, whisk together the melted chocolate mixture, coffee or water, eggs, buttermilk, vanilla extract, and granulated sugar until they are well combined.
- Mix Dry Ingredients: In a separate bowl, sift together the all-purpose flour, unsweetened cocoa powder, baking powder, baking soda, and salt to ensure even distribution.
- Combine Batter: Gradually add the dry ingredients into the wet ingredients. Mix until just combined; the batter may appear slightly lumpy. Scrape down the sides of the bowl and then mix on medium-low speed for 2 minutes until smooth and well incorporated.
- Bake: Fill each prepared cupcake cavity about two-thirds full with batter. Bake in the preheated oven for 25-28 minutes, or until a toothpick inserted into the center comes out clean and the tops spring back when gently pressed. Let cupcakes cool completely before decorating.
- Cream the Butter: Using a stand mixer or hand mixer, beat the room temperature unsalted butter on medium speed for 1-2 minutes until creamy and light in texture.
- Add Sugar and Flavor: Add powdered sugar, 6 tablespoons of heavy cream, salt, and vanilla extract to the butter. Mix on low speed until incorporated, then increase speed and beat until light and fluffy. If the frosting is too thick, gradually add more cream until reaching a smooth, spreadable consistency.
- Fill with Bones (Mummy Cupcakes): Cut a cone-shaped hole in the center of each cupcake and fill it with bone-shaped sprinkles. Place the cut-out top back onto the cupcake to seal the filling inside.
- Pipe Bandages: Fill a piping bag fitted with a small flat tip with frosting. Pipe crisscrossing lines over the cupcake to mimic mummy bandages. Leave spaces to place candy eyeballs as eyes for added effect.
- Color Frosting for Filling: Divide the remaining frosting into four equal portions. Tint each portion with gel food coloring: purple, yellow, orange, and red. Use these to fill the holes of other cupcakes and replace their tops.
- Pipe Monster Fur: Fit piping bags with grass piping tips and fill with colored frosting. Pipe “fur” over monster cupcakes. Decorate by adding candy eyes, fruit chews as noses, gummy rings or licorice pieces for ears to create unique monster faces.
- Fill Vampire Cupcakes with Blood: Lightly blend cherry pie filling to soften slightly. Fill the cupcake centers with this filling and top with a swirl of white frosting for contrast.
- Decorate Vampire Faces: Use candy fangs, candy eyes, and fruit chews to create mouths and faces on vampire cupcakes. For a dramatic bloody effect, dip a toothpick in red food coloring and add small drip lines on the fangs.
- Fill and Frost Frankenstein Cupcakes: Fill the cupcake holes with green tinted frosting and smooth the tops evenly.
- Add Frankenstein Hair and Details: Press chocolate jimmies into the green frosting to simulate Frankenstein’s hair. Add candy eyeballs, use red string licorice for a smile, and place chocolate chews on the sides as bolts to complete the look.
Notes
- Ensure all wet ingredients like eggs and buttermilk are at room temperature to achieve a smooth and well-mixed batter.
- Using parchment paper in the muffin tins helps prevent cupcakes from sticking and makes removal easier.
- You can substitute vegetable oil for coconut oil if preferred, but coconut oil adds a subtle richness to the chocolate flavor.
- When melting chocolate, use short microwave bursts and stir frequently to prevent burning.
- Adjust the amount of cream in frosting to achieve desired piping or spreading consistency.
- Get creative with decorating supplies to personalize each Halloween cupcake with your preferred spooky design.
- These cupcakes can be stored in an airtight container at room temperature for 2 days or refrigerated for up to 5 days. Bring to room temp before serving for best taste.


